[Part 23/23 | Module 5: BONUS]
Composition is a key element in taking good pictures. There are several rules here that you should know and sometimes it’s a good idea to break them and try different creative ideas.
You might be thinking a gorgeous, naked or semi-naked, nicely styled, well-lit model in an interesting shooting environment is visually interesting enough, leastwise for government work. And, in some ways, it/she just might be.
But there are more ways, non-technical ways, creatively enhancing ways that don’t rely on exposure and lighting and all the other elements of your photos that can also make your images of gorgeous, naked, semi-naked, and glamour models even more interesting, alluring, and enticing than the subject, i.e., the model, already is. That’s what this article is about.
What Is Composition?
- Composition is all about how the elements of interest (and disinterest) in your images are revealed or not revealed. It’s how they’re placed and arranged, how they’re included in your photos (or excluded) and where they are positioned and in which size.
- Composition is also about all the elements in front of your camera that underscore, highlight, or points-to your main subjects or elements of interest.
- And: Sometimes composition is about what you leave or frame-out of your photos.
There is a variety of so-called “rules” or elements of composition. These rules/elements aren’t intended to be absolute, that is, never broken or ignored. There are, however, some very good reasons why they’re called rules and elements: They work! And abiding by these “rules” or integrating these compositional elements into your photos will add much visual interest to your work.
One of these rules/elements is called The Rule of Thirds, a rule (of sorts) that is very similar to something that occurs often in nature and can be integrated into your photos: It’s called The Golden Ratio.
Some other elements of composition that will elevate your image’s interest levels are Visual Pathways using lines and the point-of-view of the camera. It is helpful that you are aware of these elements and use them when appropriate.
There are times, of course, when breaking the rules or ignoring these compositional elements may be creatively preferable. But, for the most part, you will improve your overall photography by paying attention to them, and integrating them, and doing so often when you’re framing and/or cropping your images. And that’s not simply a suggestion. It’s a guarantee!
The Basic Rules Of Composition
Here’s a neat video with a general overview of photographic composition and its elements:
The Visual Pathway In Photo Composition
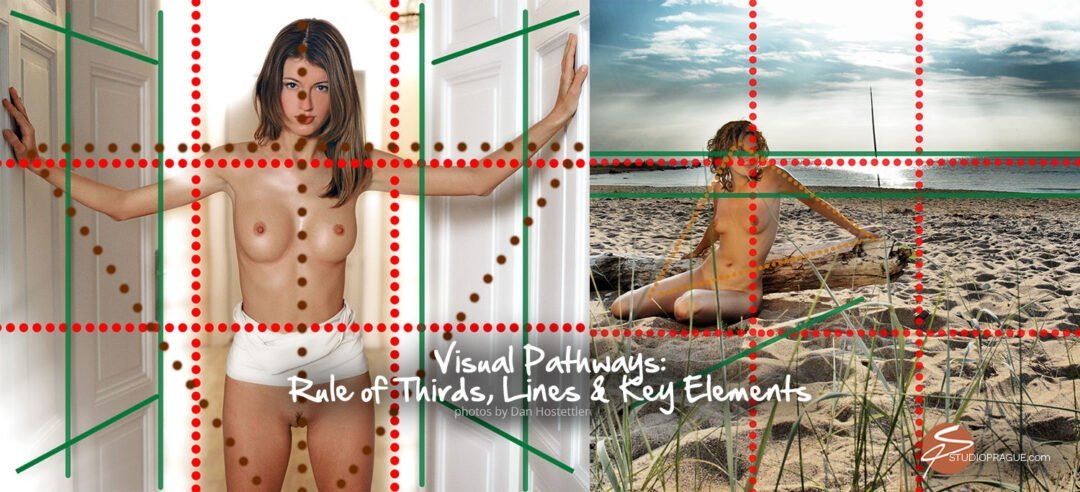
You will notice visual pathways in most successful photos if and when you know what to look for and whether they were intentionally created or not. Without visual pathways, the human eye will move around, instinctively and aimlessly, looking for pathways. These pathways tell the viewers, in subtle (and sometimes not-so-subtle) ways where to look and what elements of the photos are the important elements to look at.
Without visual pathways, the eye will wander about the image searching for such pathways. Sooner or later, the conscious mind will take over from the sub-conscious mind and decide on certain points of interest in the photo, bestowing on them levels of importance which may or may not be the important point(s) of interest the photographer intended. In other words, what the conscious minds of viewers decide are the important point(s) of interest, i.e., without visual pathways to guide them, might not be what the photographer hoped viewers would decide are the important, if not the most important, point(s) of interest.
Identifying Visual Pathways Means…
- Identifying points of interest.
- Identifying leading or guiding lines to the points of interest.
- Deciding on the entry point to a photograph.
- Determining the sequence of the remaining points, lines, and more.
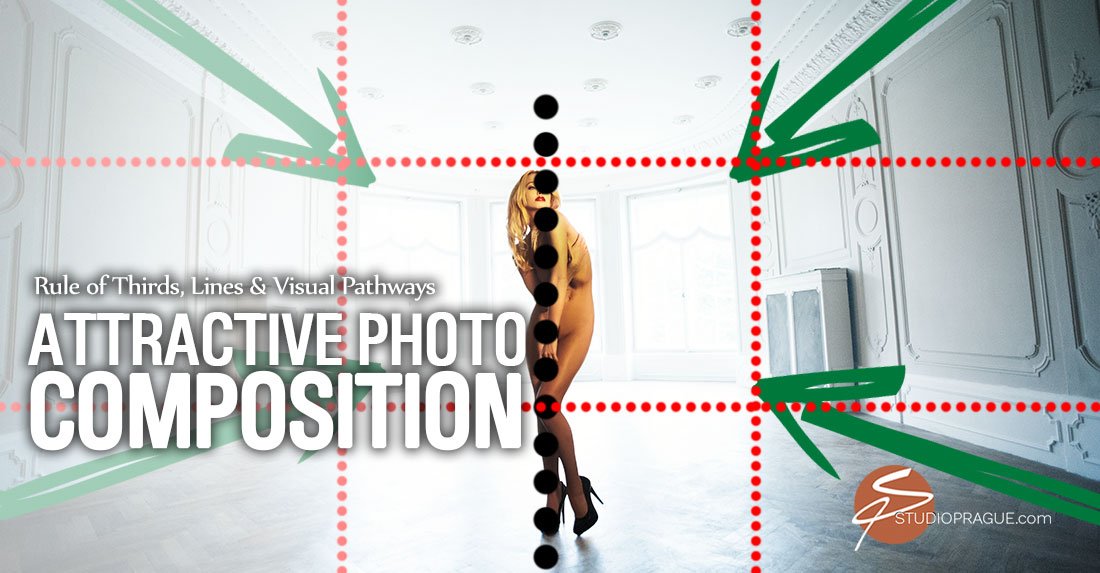
Rule Of Thirds
The Rule of Thirds (RoT) is an element of composition that helps you compose photos efficiently and without much thought. Iconic photographer, Edward Weston, once said: “Consulting the rules of composition before taking a photograph is like consulting the laws of gravity before going for a walk.” That’s what learning and practicing the uses of the rules (and elements) of composition are all about: Learning/practicing using them effortlessly and near-automatically, without much conscious thought given to them at all.
When was the last time you consciously considered the laws of gravity while you were walking? Perhaps if you fell you thought about them, afterward, that is. But that’s after you fell and, after you fell, you probably still weren’t thinking about the laws of gravity even though they were partially responsible for why you fell. Instead, you were probably thinking what a clumsy bonehead you were for falling. Course, if you fell off a high enough cliff or a tall building you likely weren’t thinking anything after you fell… unless there’s conscious thought after death. But that has nothing to do with photography.
The Rule of Thirds has been used since the dawn of art, especially for portraits, landscapes, and other types of paintings. The Rule of Thirds is a practical and visually-enhancing guideline for placing the elements of a picture in such a way the photo looks well-balanced and cohesive as a whole. It is, on its own, a visual pathway to what’s most important in a photo.
Use of the RoT will not only provide a helpful pathway for viewers’ subconscious minds to automatically search for such pathways, it yields an important and well-regarded (artistic) component to a photo’s overall composition, sometimes it’s most important visual and artistic component. The RoT can be used for all types of photography including, but not limited to, beauty, glamour, and (artistic) nude photography.
So how do you apply the Rule of Thirds to your photos? It’s quite easy.
First, split the frame into nine imaginary sections. They should all be equal. Two equally-spaced vertical lines and two equally-spaced horizontal lines create nine, equally-sized rectangular sections. Then, place the main subject of your photo at one of the positions where two lines, i.e., one vertical and one horizontal line, intersect. Doing so will automatically give you a well-balanced composition as compared to, say, placing your subject smack-dab in the middle of your frame. If that sounds in any way complicated, it’s not. It’s easy and simple. How so? Because your placement of the subject at those intersecting lines doesn’t need to be precise.
You won’t need a protractor or a slide-rule or a class in geometry. Often enough, all you need do is come close to those intersections, that is, provide an obvious “nod” to the Rule of Thirds by coming fairly close to whichever intersecting lines you choose. If you do that, if you just come fairly close to those lines, the RoT’s magical properties will work its compositional alchemy on your images.
The Golden Ratio Spiral
Huh? Yet another refinement? Yes! You can create the Golden Ratio within the Golden Ratio within the Golden Ratio. And this is how you do it…:
The Golden Ratio Spiral is a logarithmic spiral with a growth factor that’s equal to the Golden Ratio. Meaning, that for every quarter-turn the spiral makes, the line gets 1 Golden Ratio further away from its center point, eventually creating something that looks like this:
The Golden Ratio Spiral is also known as the Golden Mean, Phi, or Divine Proportion, Fibonacci Spiral.
Watch a comprehensive explanation here:
Leading Lines
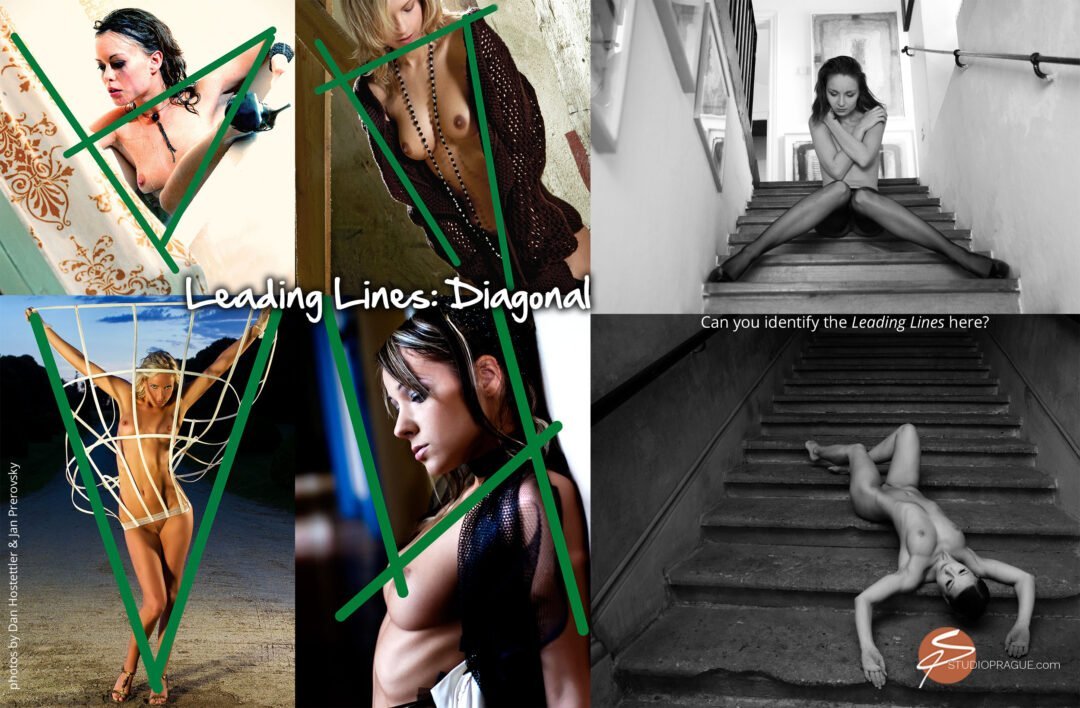
Lines can be used efficiently and effectively for adding structure and visual pathways to any photographic image. Lines are what you see at the edge of the subject. Strong lines are powerful. They can point the viewer where to look. Interestingly, while all lines are powerful in photo compositions, diagonal lines are the strongest of the strong.
Good leading lines are strong lines, bold lines, lines such as roadways, railroad tracks, and horizon lines are lines that draw obvious attention in powerful, albeit sometimes overused ways. Fortunately, lines don’t need to be as obvious as roadways, train tracks, or horizons to be effective leading lines you can potentially use as visual pathways in your photos.
There are different types of lines that can be used in photographic compositions. They fall into three categories:
- Actual lines
- Inherent lines
- Implied lines
Actual Lines
Actual lines in an image are powerful. All of them are. But, in the world of actual lines, diagonal lines are the strongest of the strong. Diagonal lines are so powerful that viewers near-instantly move their eyes and focus on the main subject of a photo if and when those lines point or lead the viewer to it. Diagonal lines will do this quicker than via any other sort of line, or any other element of composition for that matter. Any line that is tilted just one degree or more is a diagonal line; the greater the tilt, the stronger the diagonal line.
Diagonal lines can be very obvious by running through an entire image, from one corner to another, even if they are rather subtle in form, texture, or other ways. Models can easily create diagonal lines with their arms and legs and should be encouraged and directed to do so. Experienced models know the value of diagonal lines and often create them, automatically, while posing. They might not be aware of how diagonal lines work in photographic composition – they’re not photographers after all – but they often form diagonals with their arms and legs almost by instinct.
You can use diagonal lines in many ways. Examples: You can create or utilize diagonal lines that are or can be formed by jewelry, hair, the neckline, even a model’s cheekbones or the V-necked blouse she’s wearing. Simply having your model tilt her head to one side or the other forms a diagonal line.
Inherent Lines
Inherent lines are lines that exist, physically, in the shooting environment captured in an image. These lines are created by physical elements like door frames, trees, a window, a staircase, edges of a wall, and so forth. Inherent lines can be vertical, horizontal, or diagonal. If you want to give your image strength, include horizontal and/or vertical lines in it. Diagonal lines, on the other hand, often appear more subtly in images but are, subtle or not, stronger and more visually appealing.
Why that is from a how-the-human-brain-works point of view doesn’t matter much to photographers. Simply that lines work so well because of how human brains perceive them in the ways they perceive them in an image is what matters most.
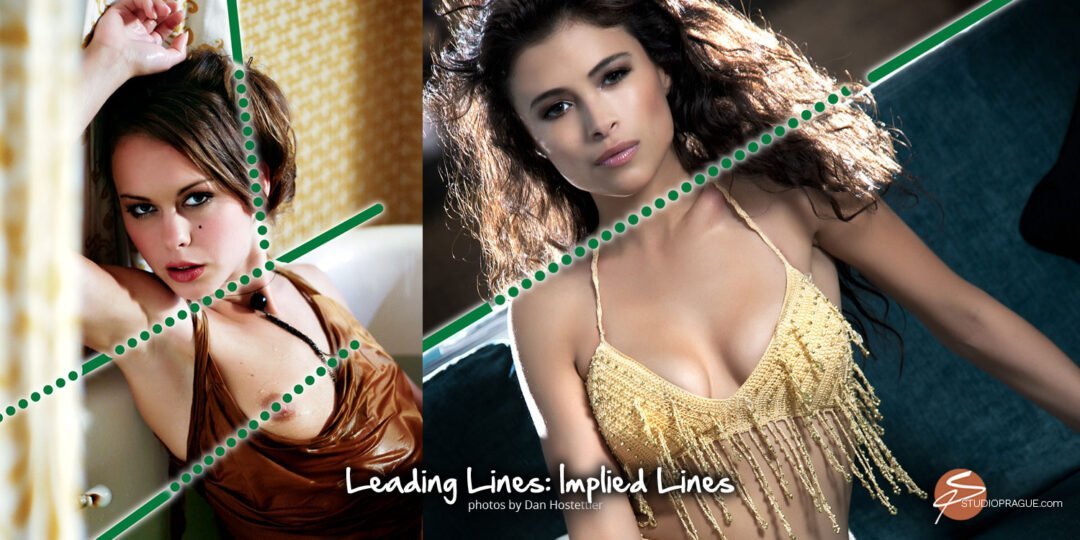
Implied Lines
Implied lines are unlike inherent lines. They are not physically present in the environment or the image. Instead, they are somewhat imaginary, created by the human brain as a result of perceptions. For instance, if you crop out the model’s elbow or knee joints from your image, your viewer will still be able to imagine them even though they’re not there.
In this case, the implied line is the outside perimeter line of the photo. Viewers don’t have problems imagining things like missing joints or the rest of a model’s limbs in photos. They just go with it. They simply go with the flow to quote a popular phrase. The human mind will not merely and automatically visualize the missing joint, but the entire missing limb.
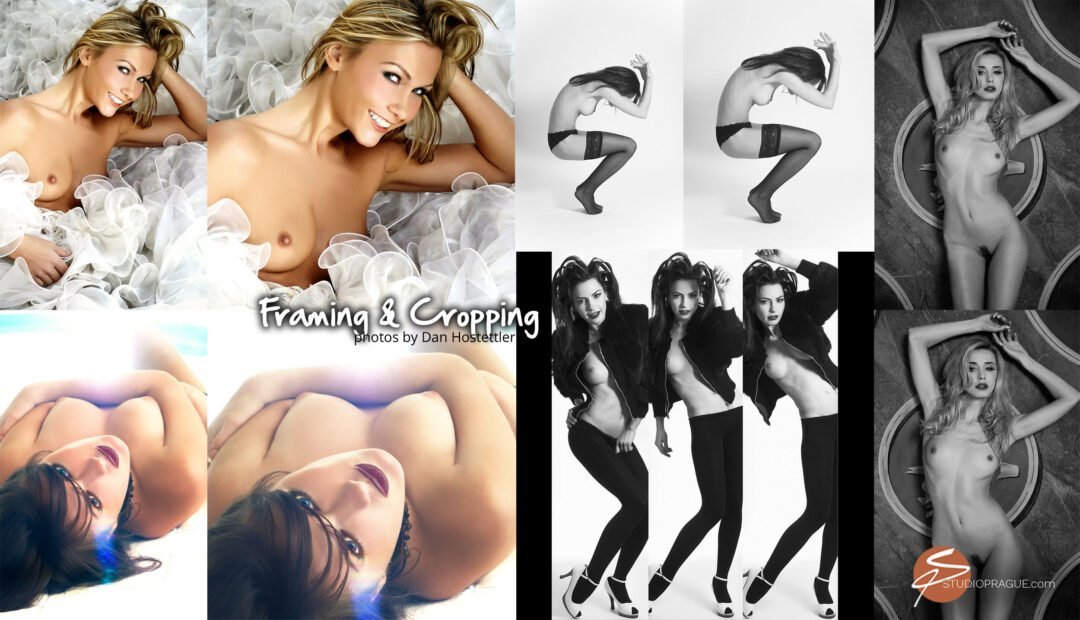
TIP: As a rule, if you’re going to crop around joints, it’s nearly always better to do so above the joints rather than below them. When framing and cropping images that aren’t full body shots, make it a habit to crop above the joints. Cropping below joints is, for the most part, not visually appealing or aesthetically balanced, and can tend to make the model look like she has amputated limbs. For whatever reason, cropping above joints doesn’t create this sort of illusion or perception in the minds of viewers.
Viewpoint: Point Of View (aka POV)
The position, height, and direction of your camera will define the picture’s point of view. You will be able to change how the viewer perceives the subject by changing the point of view. Try out different camera angles and you can discover this yourself by how you later perceive the image and its subject.
For instance, you can make your model look very tall by making the camera look upwards. Not only does this POV make the subject tall(er) but it adds emotional and psychological power to her. Movies use this technique all the time. John Wayne was made to look larger-than-life regularly using this sort of camera angle. Camera angles can and do alter the effectiveness and mood of your picture. The viewer’s perception and reaction changes with changes to the camera’s angle or point-of-view. There is no best point of view. It all depends on what your intentions are! What you’re saying, silently, about your subject.
Framing & Cropping
Framing and cropping are very important. Think of the framed image as being what you want to portray within the confines of the viewfinder of your camera. Cropping allows you to later make adjustments to your framing and can also change the attitude, mood, character, and personality of your photo and/or model. It’s generally a good idea to frame your photos in ways that are somewhat close to how you will later crop them.
The story you want to tell can and will often depend on your camera’s position and angle. Zooming in or out (or moving further or closer to your subject when using prime lenses) are also part of your framing; it’s not simply about the vertical and horizontal outside edges of your frame you achieve by panning or tilting your camera. In other words, there are many ways, almost infinite ways, you can frame your subject.
Try shooting your model from a variety of angles and points-of-view. Use these different perspectives and see how they alter your perceptions, sometimes subtly and other times obviously, when later looking at your pics. Your altered perceptions about them are the same as when your viewers look at your images.
Here’s A Good Video On Composing Great Portrait
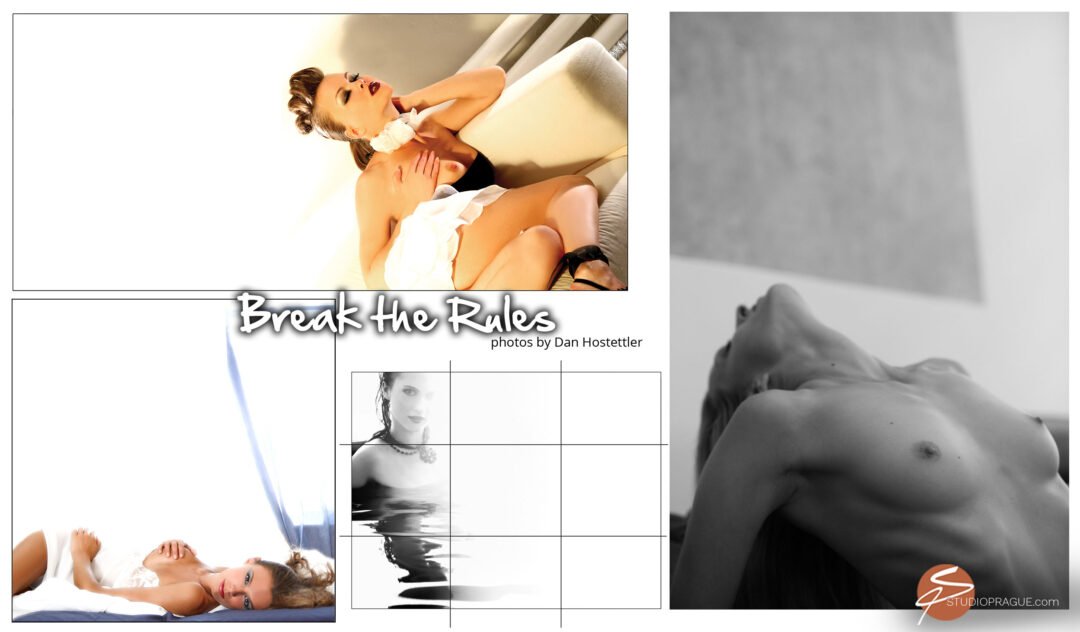
Break The Rules! Be Creative!
It’s said that rules are meant to be broken. It’s a cliché statement, for sure, and some rules, non-photography rules, are rarely meant to be broken. (Speeding, as an example, come immediately to mind.) But in photography, there’s almost no rule that can’t be broken in creatively effective ways.
It’s as true for people, beauty and nude photography as it is for any other genre of photography.
Breaking the rules can sometimes mean the best shot(s) in your sets. It can also mean some of the worst shots in your sets. That’s why breaking the rules is often akin to experimenting. The results might be a success or they might be a failure. If you don’t try, however, those successful results won’t happen.
More than a few people believe there should be no rules or guidelines whatsoever dictating artistic pursuits. Whether that describes you or not is a matter of your own personal artistic beliefs. What is true, though, and should be remembered, is that nearly always when rules have been broken in awesomely effective ways, they were broken by artists and craftsman who knew the rules – knew them well and could use them well – before breaking them.
Pablo Picasso became a world-famous and iconic artist by breaking the rules of classical and traditional art. But be assured, Picasso could (and did) paint in classical and traditional ways earlier in his career, and he did so like a master!
Breaking the Rules: 10 MYTHS ABOUT THE RULE OF THIRDS
Thanks for reading. I hope you have enjoyed your journey. Feel free to contact me anytime for additional information.
Author: Dan Hostettler 

A traveler at heart, inspired by women, working along Swiss precision.
Dan is a mediapreneur, photographer, author of several books, owner of StudioPrague and Founder + Editor in Chief of SexyWomenPhotography.com. Being a successful photographer for more than 15 years Dan got internationally published and featured on/in GQ Online, The India Times, FashionONE TV, FotoTV, GoodLight Mag, amongst many others.
Dan is currently residing and working in Prague, CZ, conducting nude photography workshops, productions and pushing educational formats to a new level.
Consider a Small Donation?
Your donation helps to sustain, create and regularly update the free content for you.
I love offering my knowledge to you and a small token of appreciation helps to keep the lights on.
Thank You!
Consider a Small Donation?
Your donation helps to sustain, create and regularly update the free content for you.
I love offering my knowledge to you and a small token of appreciation helps to keep the lights on.
Thank You!

