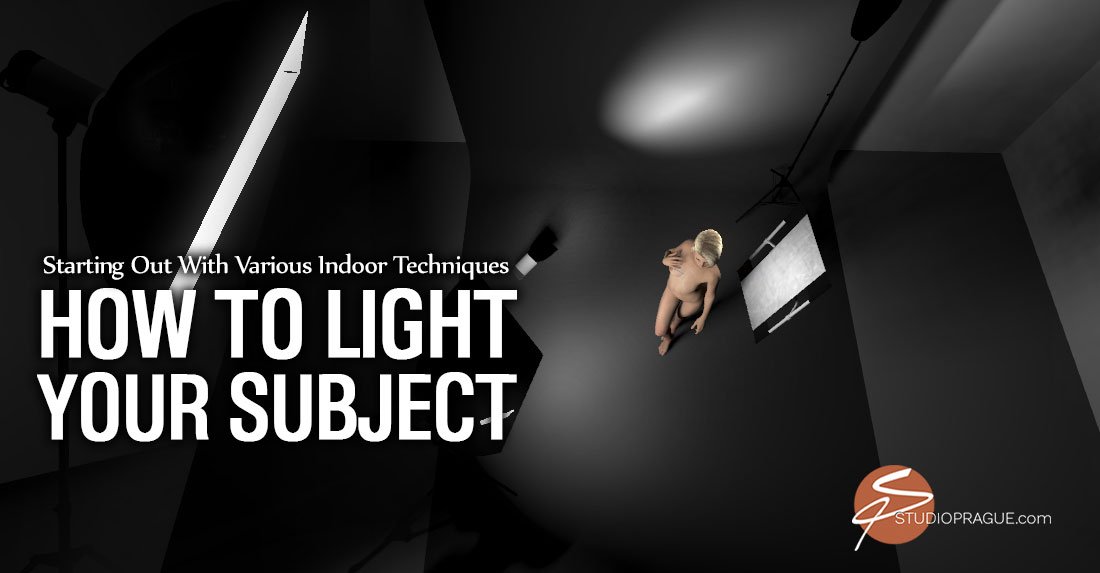
[Part 16/23 | Module 3: MASTERING THE LIGHT]
Understanding lighting strategies on your subject (aka lighting setups) opens up a wide range of possibilities for your photography. Or rather: the moods, styles and message you want to convey. No matter if you work with artificial light, mixed lighting situations or just natural light.
Indoor Shoots: No Rain, Snow, Or Other Inclement Weather Difficulties But…
When you’re shooting indoors, whether it’s a studio, a home, hotel room, or any other sort of indoor location, lighting your model in ways that best accentuates your model’s beauty and allure, presents challenges whether you’re using artificial light or the location affords you opportunities to utilize natural light via doorways, windows, skylights and those sorts of things permitting the outside natural light to come into the indoor location.
Sources Of Light For Indoor Locations
There are two types of light sources – natural and artificial. Both can be used indoors or out. They can be used exclusively, i.e., natural or artificial light alone, or in combination with each other, i.e., natural light augmented by artificial light or vice versa.
- Natural light is light emanating from the sun, whether it’s direct or indirect.
(YT Video: “Natural Light Lingerie Photoshoot” by Anita Sadowska ) - Artificial light is light emanating from electronic devices like studio strobes, speedlights, lamps, street lights, automobile headlights, Christmas-tree lights, candles, lighters, televisions, computers, you name it. Whatever creates light artificially and electronically, can be utilized to one degree or another.
All of the above can be used to light a model on its own or to add to the overall lighting you’re using to light your models.
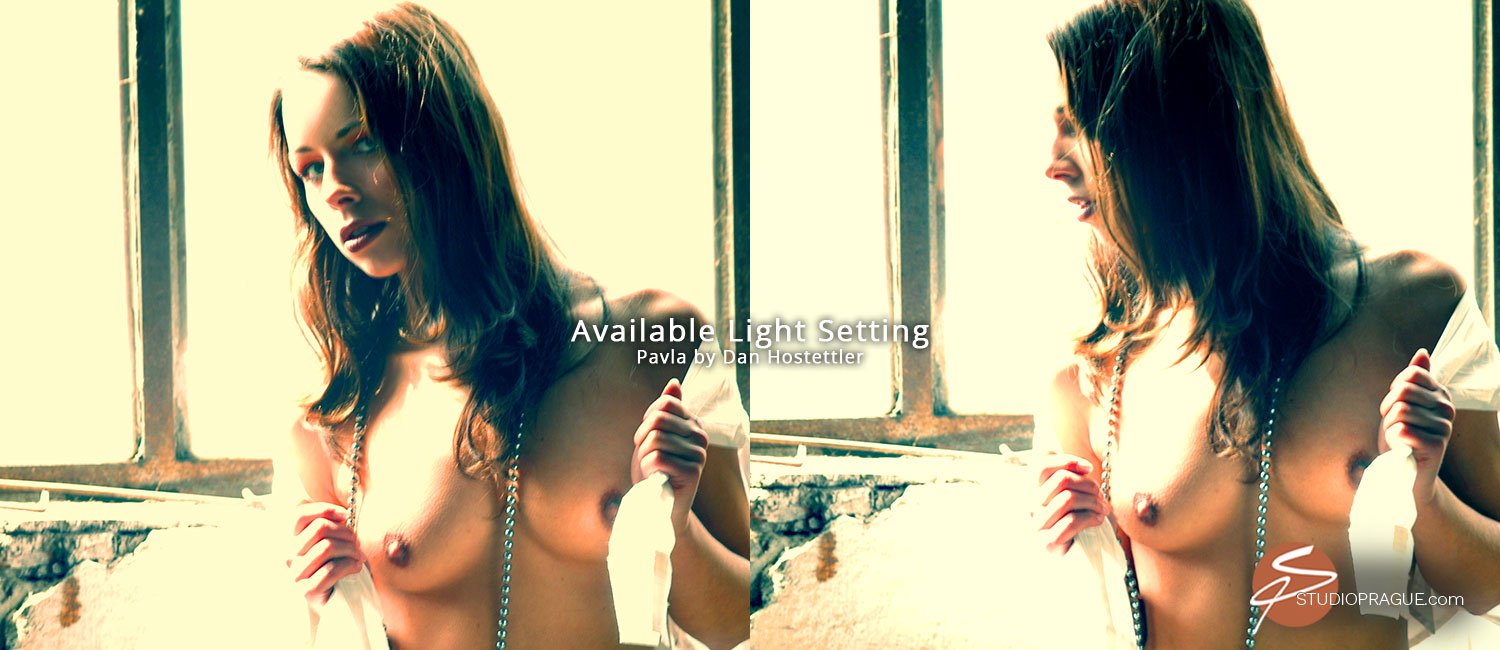
Available Light: Photographing Models Without Additional Lighting
Available light does not exclusively refer to available natural light. Available light is all around us. This classification has nothing to do with the origin of the light. It does not matter if it is natural or artificial. It simply refers to light that has not been added-to with specialized lighting devices provided by the photographer. In other words, no additional flash or continuous lighting devices are used to enhance or alter the available light. Available light can either be direct or indirect (indirect available light is often referred to as ambient light.)
Available light may be created by the sun, by artificial means, or by both types of light sources working in concert.
When you arrive at a location, the available light is the light that’s just there and available for you to use (YT Video: “5 Setups for Indoor Natural Light Photography” by Mr. Eman ). These days, with digital cameras capable of higher and higher ISOs with less and less visible noise, working exclusively with available light has become more and more popular and widespread. Often enough, the terms available light and ambient light are used interchangeably by photographers.
What you can’t do with available light, leastwise without bringing reflectors or other tools into the mix, is to modify or enhance it. It is what it is. The light’s character can be dramatic or it might be boring and lack contrast or “punch.” There are all kinds of scenarios possible. So, who is the judge of good or not-so-good available light? That would be you, the photographer.
Lighting Setups With Flash
When working with artificial light that you provide for indoor locations, you will generally have total, near-total, or the majority of control of your lighting.
Exceptions are when there are doorways, windows, or skylights which do not permit you to alter natural light that may be coming through them. Also, some indoor locations may have artificial lighting, e.g., banks of overhead fluorescent fixtures that you are unable to control or alter. But, to make this simpler, here are some suggestions for working with light sources (such as speedlights or monolights) which you have total or near-total control over.
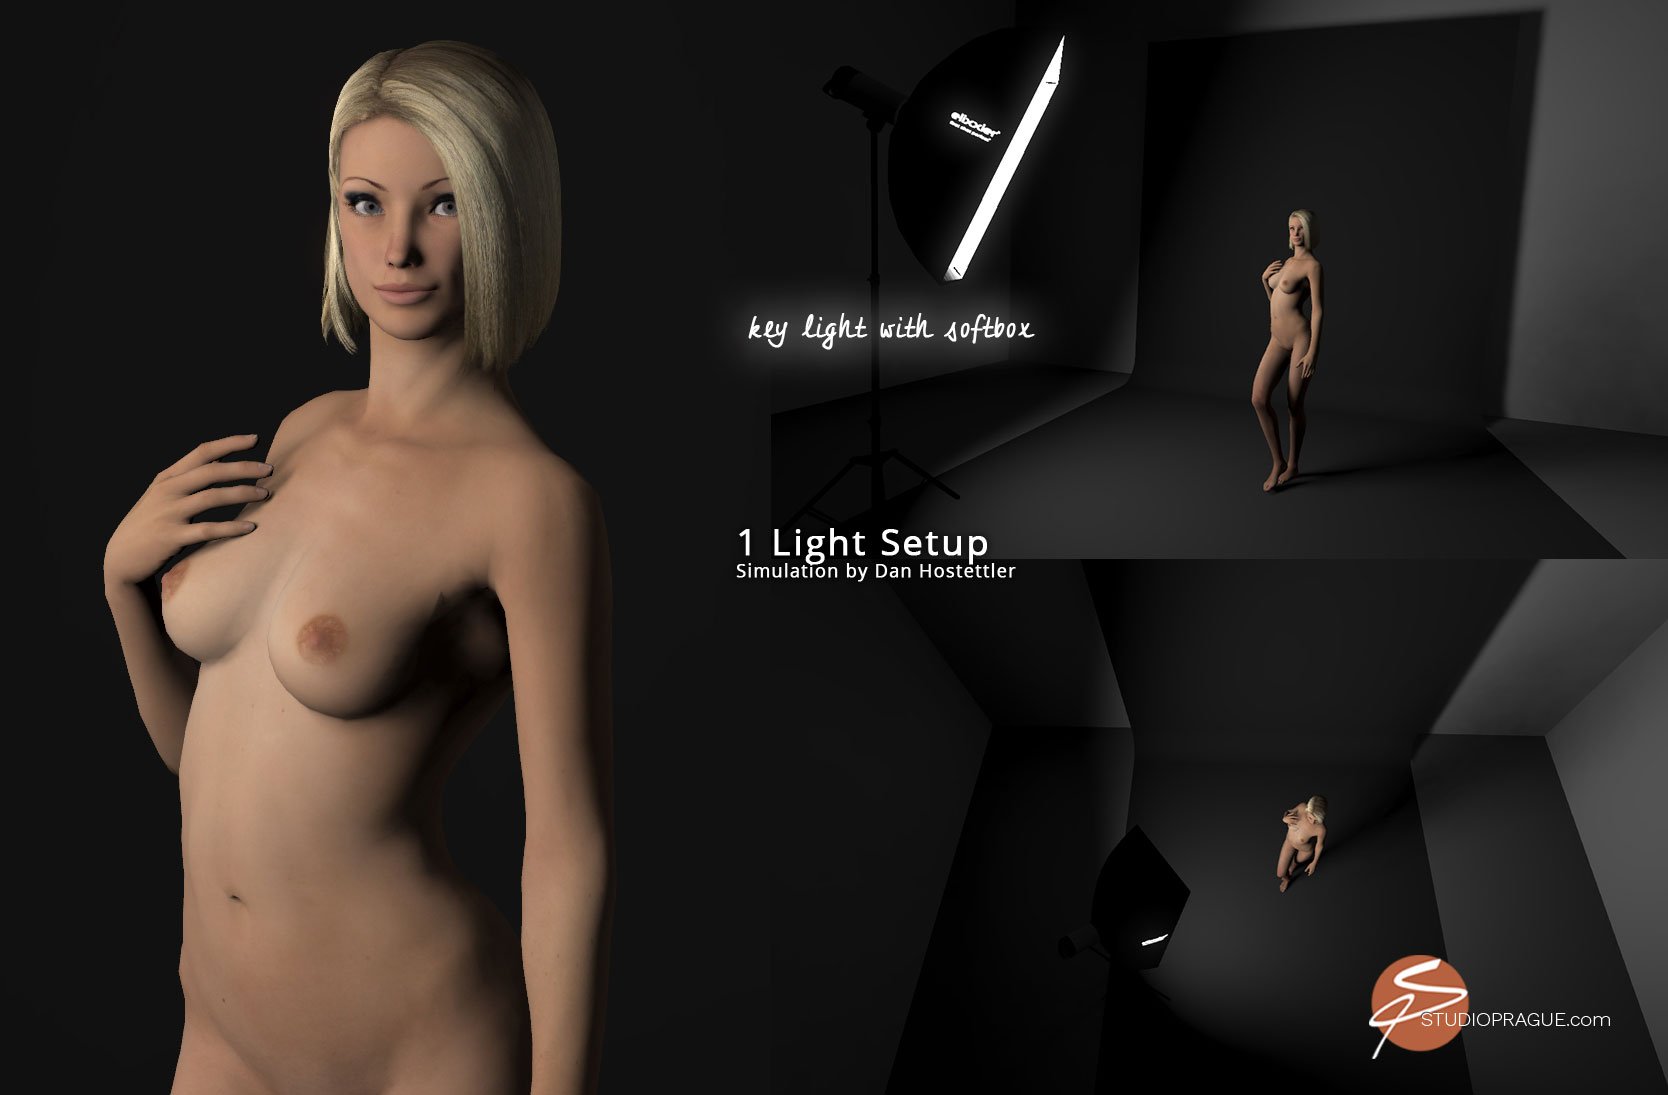

Simple & Amazing Results: The One-Light Setup ( here’s a webinar of mine )
If you’re just learning to use controlled lighting, you might want to begin with a single light source. It’s probably a good idea to master one-light portrait techniques before moving on to multiple light setups. In one-light portraiture, a single light source, i.e., a key or main light, is all you’ll be using. You’ll probably want to modify your one-light source with an umbrella or a soft-box. Which should you use? Umbrella or softbox? That often depends on how controlled you want the light to be.
A reflective umbrella offers little in terms of controlling how the spread of the light that reflects off of it. A shoot-through umbrella offers a bit more control. But still not much. Softboxes offer even more control. If you add a grid to the front baffle (or diffuser) of a softbox, you will further contain the spread of the light and have more control over the spread of the light. In this setup, there is just one key light.
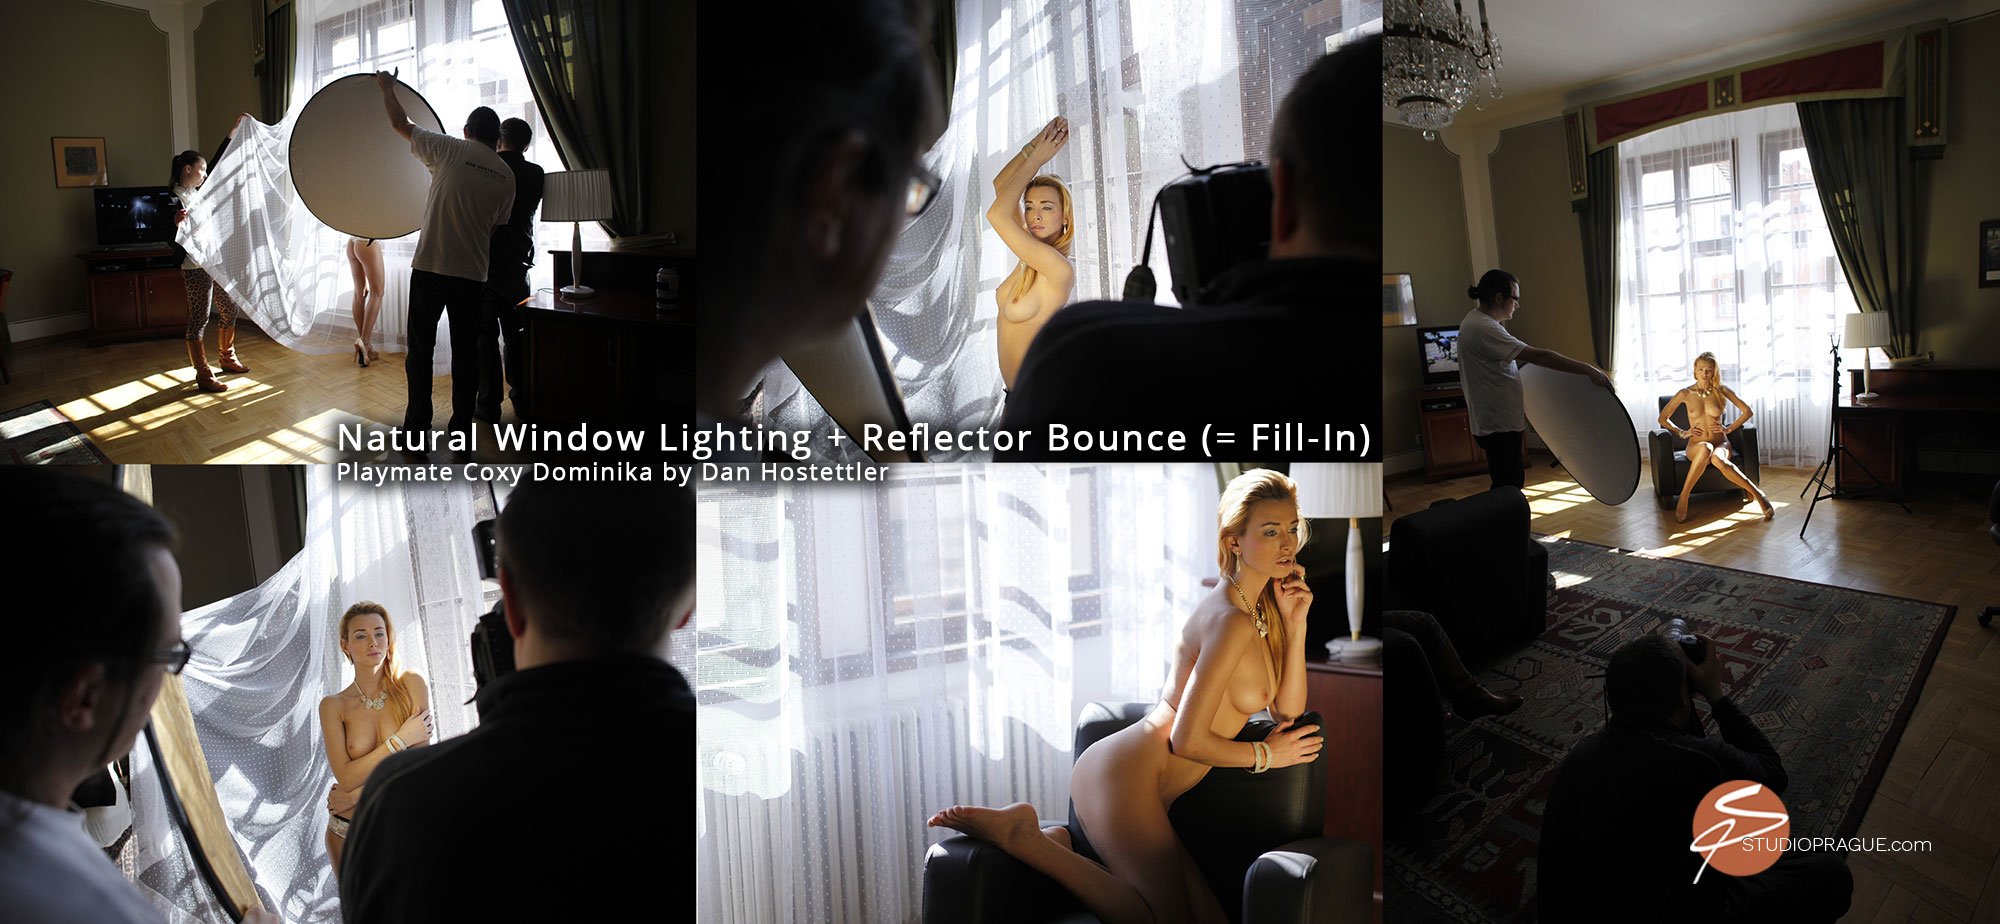
You can still provide fill light with single-source, one-light lighting, but you’ll be doing it with a reflector to bounce some of the light to the model but from a different angle than your single light source is producing. There are all kinds of reflectors: you can use from collapsible disk reflectors to white foam core or pieces of white Styrofoam, or even a mirror can be used. What you are doing with a reflector is re-directing some of the light back onto the model. The light reflected will not be as intense or powerful as that coming straight from your light source but that’s okay. You’re using the reflector for fill and fill lights should not be as intense as the key or main lights.
Some reflectors will produce a “harder” light than others. For instance, a white reflector will provide softer light while a silver reflector will provide harder light. Gold reflectors produce a harder light plus they also created a gold-hued color cast. Gold reflectors can be used to “warm” the skin of your model. Originally, gold reflectors were designed for shooting subjects in the shade with daylight balanced film. The color temperature in the shade leans towards blue and the gold reflector warms skin tones in an otherwise slightly blue-ish shooting environment.
Reflectors can also be used to produce accents on hair or other highlights on the model’s body. Some photographers shoot one-light images and use reflectors to create what’s called clam-shell lighting (or bookend lighting). Clam-shell lighting adds fill from below and above the model. Bookend lighting provides fill from either side of the model. Clam-shell and bookend lighting are like creating large barn doors with reflectors. While barn doors are generally black and are used to limit and control the spread of the light, reflectors (when used in clam-shell or bookend lighting technique) re-direct some of the light from the same sorts of angles barn-doors prevent the light from spreading to.
Even on its own, i.e., when using a single-source without reflectors, one-light images have the potential for delivering stunning photos. Often, fine art nude photographers limit themselves to one-light portraits with their single light set in positions other than where a key or main light is most often set. Use your imagination! Creative uses of a single light source, with or without adding reflectors, can create quite adequate, if not dramatically, and aesthetically pleasing results.

The Two-Light Setup
Once you’ve become comfortable with one-light setups, it’s time to add a second light. Again, as with your one-light images, you might opt to use an umbrella or a softbox to modify your second light. You might try adding the second light to illuminate your background rather than aiming it at your model. You can still use a reflector for some gentle fill or highlights, reflecting the light created by your main light. Or, you might opt for using the second light as a hair-light creating pleasing highlights on the model’s hair. Either way, a second light source can add much to your overall image.
TIP: If you want to prevent light from your second light from spilling onto the background, you can utilize a barn door or a flag of some sort between the second light and the background. This lets you control the accent light on the model more precisely while preventing (or flagging) light from spilling onto the background. Conversely, if you’re using your second light as a background light and you want to prevent light from spilling onto your model or possibly creating a lens flare, you can do the same only, this time, you’ll be “flagging” the light between it and the model.
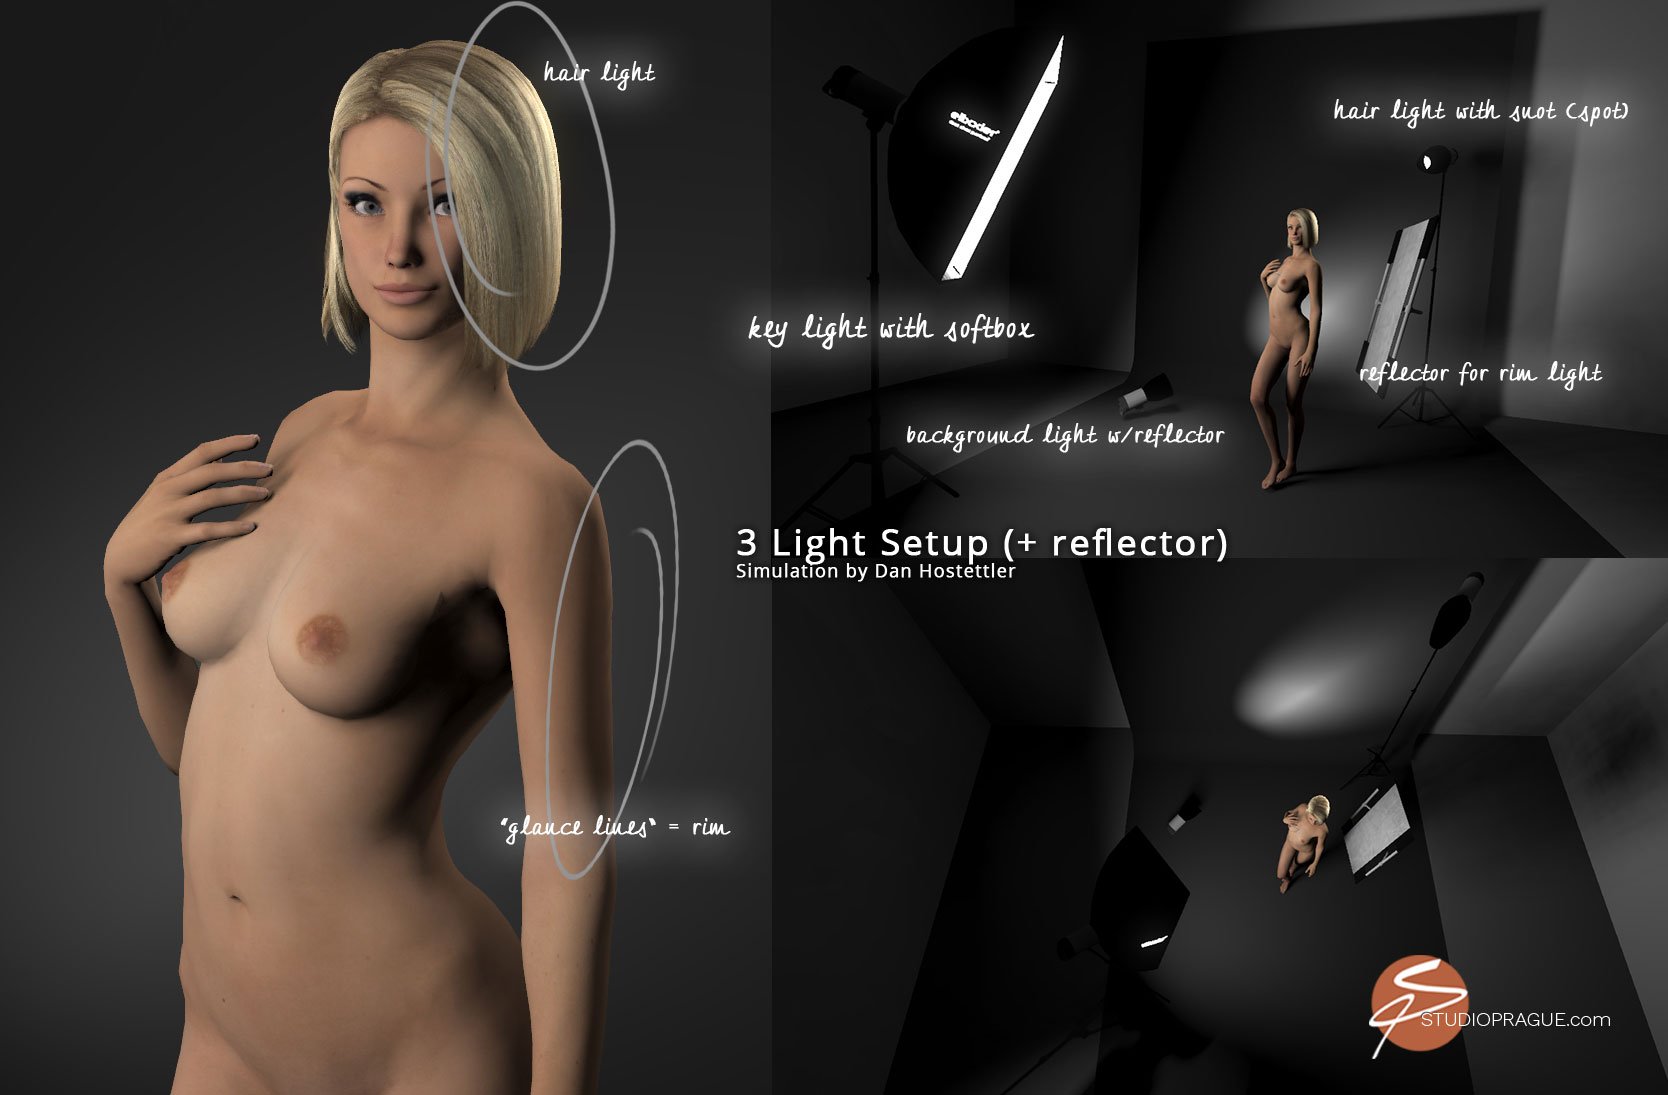
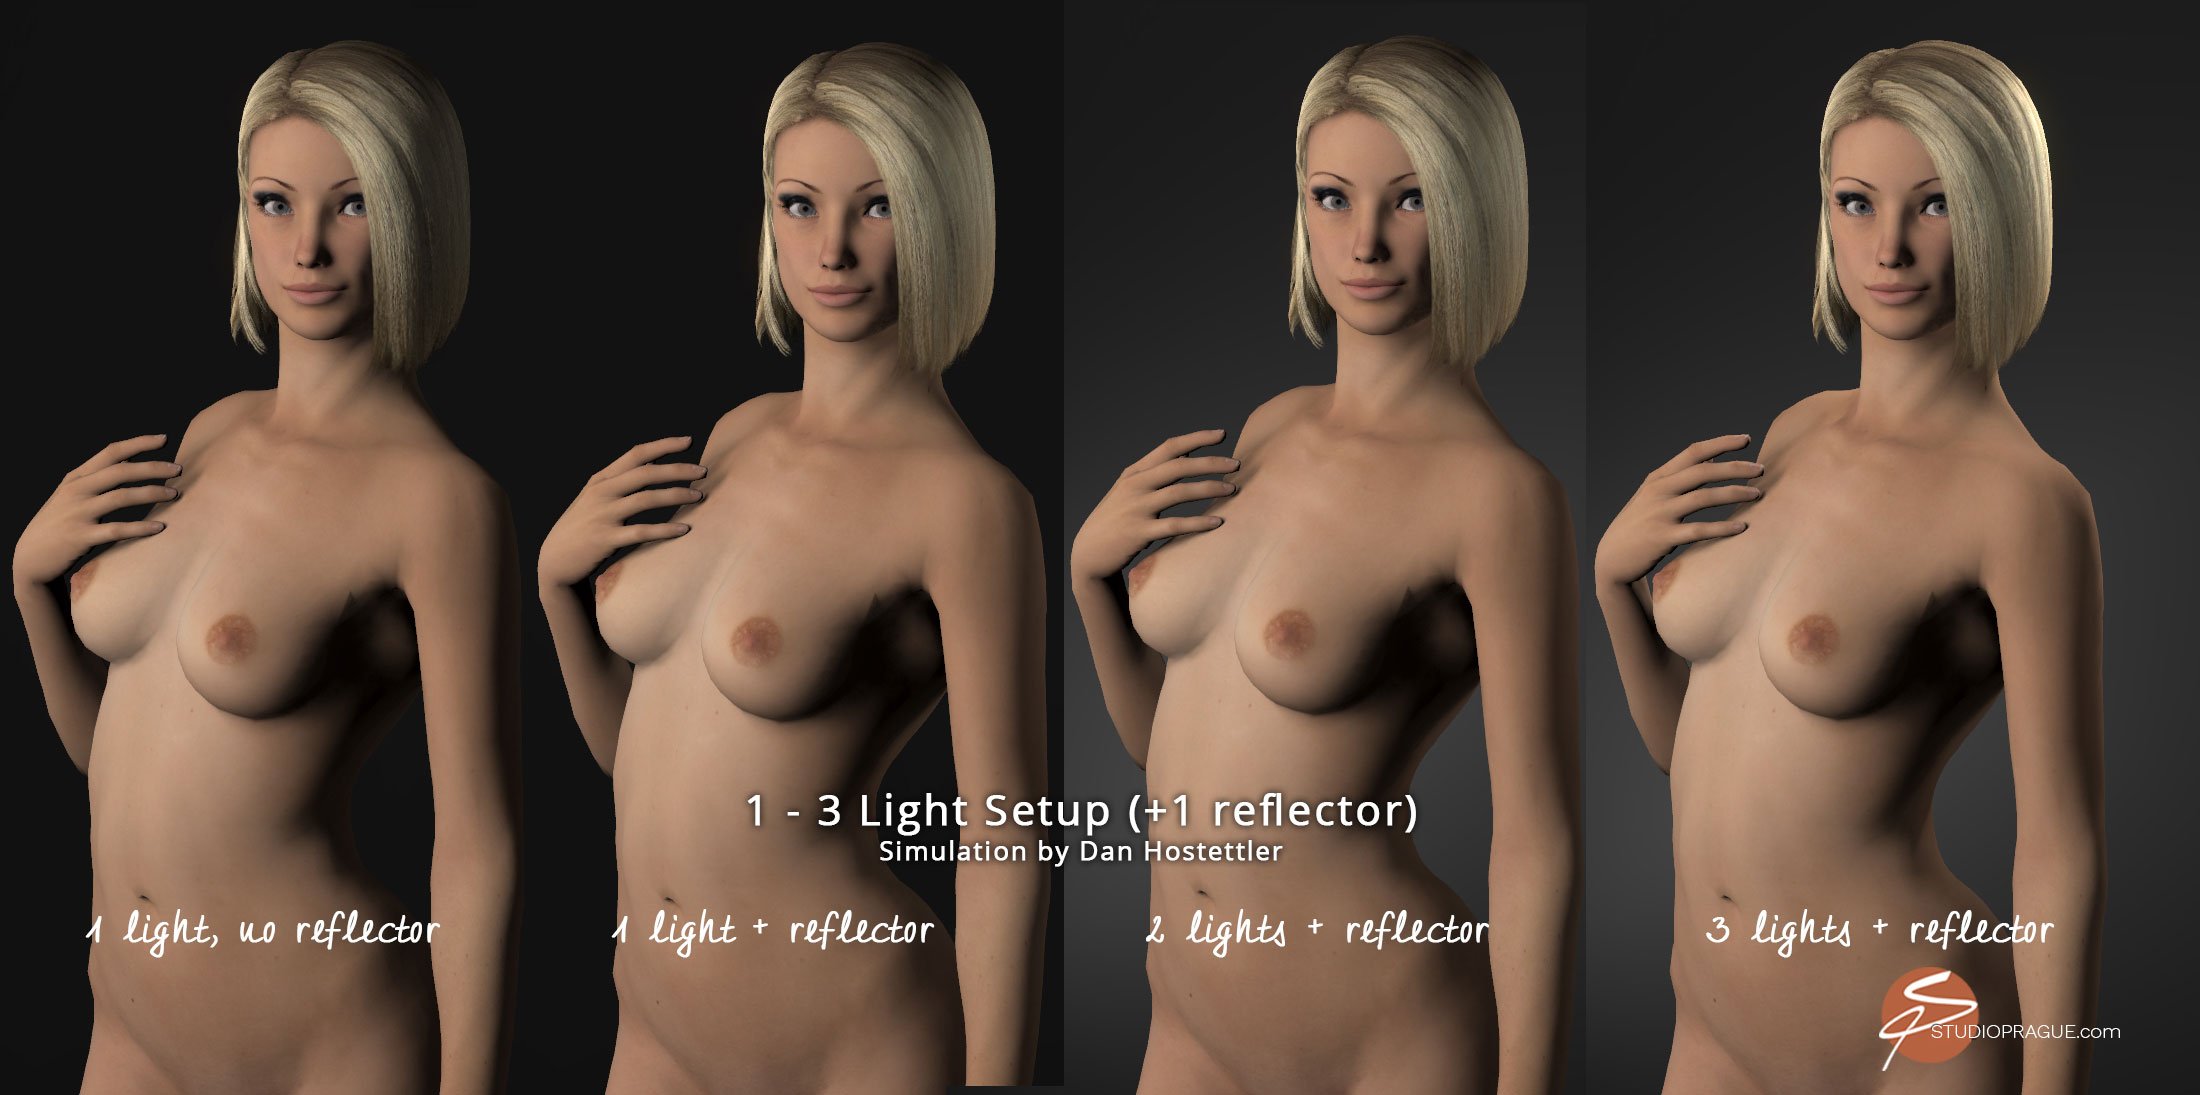
The (Traditional) Three-Light Setup
While using three lights is more advanced in some ways, and it’s probably a good idea to resist going with three lights until you’re comfortable using one and then two lights, it’s a traditional lighting technique for glamour, nudes, as well as many other types of portraits.
As the title suggests, three lights will be in play here. Commonly, this lighting configuration will include a key light, a fill light, and a separation light (kicker or hair light). Sometimes, it might utilize a key light and two separation lights, forgoing the fill light and/or using a reflector to provide front fill. The three-light configuration is also called “triangular lighting.” That’s because, if you draw straight lines between the lights, it forms a triangle around your model or subject.
The first light is your key/main light. As always, it’s your main lighting source and the other lights are subordinate to it. In other words, the key light is the boss and the fill and the background (or separation) lights are its minions.
By using an additional light source as a fill light (the 2nd light), you will be able to open up the shadows, although you’ll be reducing contrast (when adding fill light.) Adding a fill light and reducing contrast are artistic decisions made by the photographer. There is no rule governing the use (or lack of use) of a fill light. It’s all about the “look” of the image the photographer wants to create. Some photographers nearly always use a fill light while others rarely do. Doing so, or not, might be part of their “style.”
The 3rd light is the separation light. For example, if you have placed a dark-haired model against a dark background, the separation light enables you to separate the subject from the background which gives you a visible outline from behind. (This light can also be referred to as a rim or edge light.)
Another option is to use the separation light strictly as a hair light by aligning it diagonally from above and behind the model and aiming it at the model’s hair.
TIP: Place the main light source to one side of the model with the fill light on the other side (for filling in the shadows). When doing so, the separation light is kept behind the model, i.e., to accentuate the hair or to provide an edge or rim lighting. Again, this called triangular lighting and was first utilized in the very early days of motion-picture photography (aka cinematography).
Creating Atmosphere: “Side Bounce” Is Your Friend
If you are on a tight budget or if you cannot go for a 3-light setup because of time constraints or other reasons, here’s a way to simulate triangular lighting. Have the model pose a few feet from a wall (assuming the wall is painted with a fairly bright color) and target the light source towards the wall. The light will reflect (or bounce) off the surface of the wall back onto the model. The resulting highlights or accents on your model will appear naturally illuminated. You can move the light closer (for a harder light) or farther (for softer light) from the wall.
A bit of practice and experimenting will help you decide what works best for you and your aesthetic taste. Be aware: Depending on the color of the wall, it might throw an unwanted color cast onto your model.
TIP: If you don’t have a bright wall to work with, you can use white cardboard, foam core, a reflector, or even a light-colored table cloth, shower curtain, or drapes. That will work well.

Surround Bounce
It’s like “surround sound” that your stereo or home theater equipment audio equipment produces, only with light instead of sound. Set a flash unit in a way that enables you to light up a big bounce area in a mid-sized room. The ceiling and walls will diffuse and scatter the light throughout much of the room. This technique will give your photos a natural-light-like light. But again be aware of colored walls/ceilings as they may create an unwanted color cast.

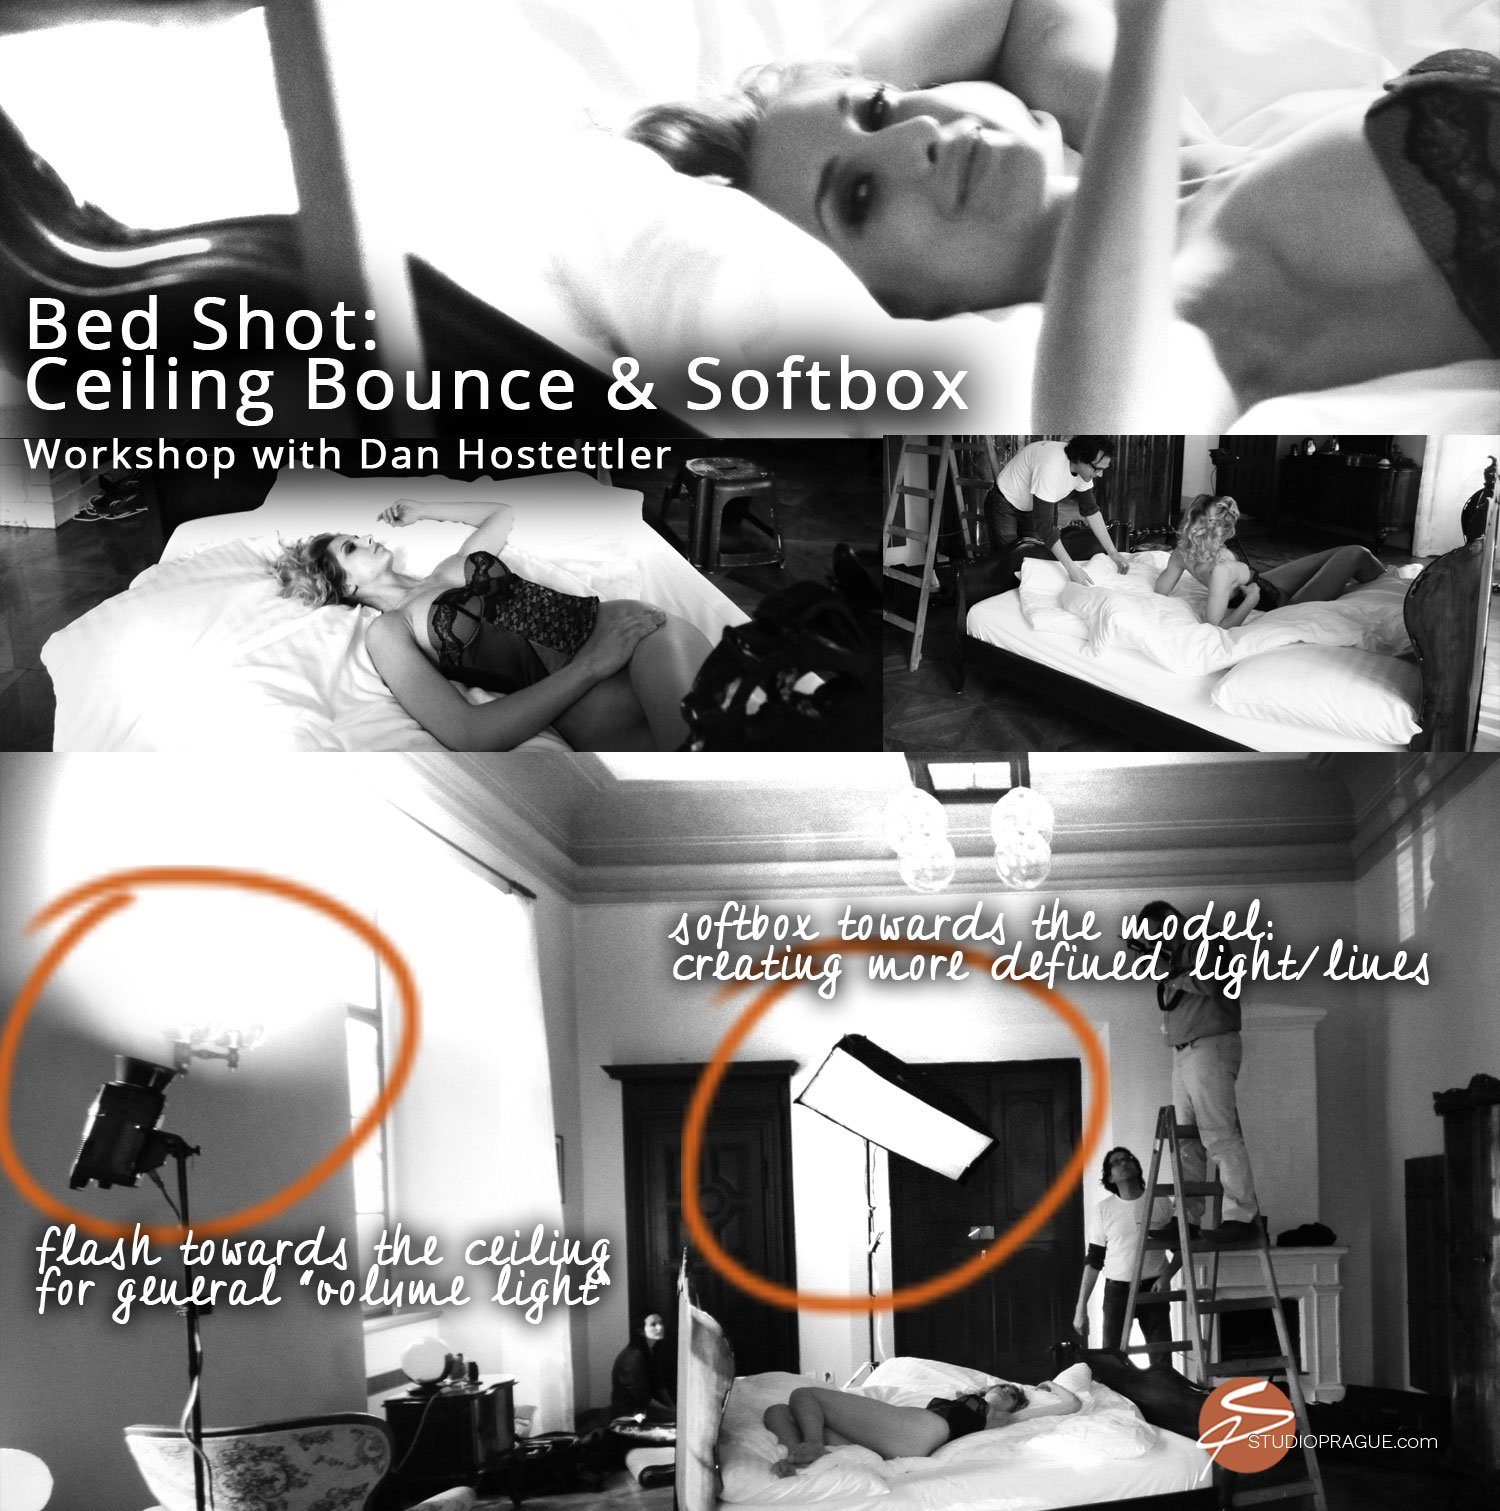
Goodie: Floor or Bed Shot
Floor shots are similar to wall bounce shots. However, everything is flipped by 90 degrees to the ceiling here. The ceiling works as your softened reflector. I.e., the model is typically lying down on the floor or bed, while the light source is pointed towards the ceiling. The light bounces back and thus beautifully illuminates the subject.
TIP: You can also use a large (100 cm/40’’) silver reflective umbrella instead of the ceiling. This will create a bit more of a “crisp” light, but it will still scatter the light and provide natural-light-like lighting.
Indoor Shoots: A List Of Things You’ll Need
- Speedlights, Monoblocs, or Continuous Lighting devices. Light Stands.
- Umbrella or Soft Box.
- Disc Reflectors or the like.
- Tripod. (Optional but you never know when it will come in handy.)
Now To You
Indoor photography has its challenges like all photographic scenarios do: It requires learning and practice… – but you know that already, right? Now, however, you should have enough introductory information to begin shooting models and to turn it into a rewarding experience for yourself as well as your model. Take it step-by-step. Follow the tips that have been offered to you and practice them. Enjoy the experience.
In many situations, you won’t need to utilize elaborate lighting setups. You can make stunning photos with one or two lights. Start with a single light and learn to effectively use one. Then, add another light and learn to use two. Many of Playboy’s photographers sometimes use a dozen lights to photograph their models but they all began by learning to use a single light and went from there.
Thanks for reading.

set.a.light 3D Basic & STUDIO (Software)
set.a.light 3D STUDIO is the world’s first photo studio simulation, with which you can build lighting setups in advance. It’s the perfect photography studio simulator.
Prepare your shooting easily and plan the smallest detail, even before you enter the studio- all you need is a computer and ideas! Save a lot of time and money with experimenting & implementing your ideas & visions before you get on spot.

Author: Dan Hostettler ![]()

A traveler at heart, inspired by women, working along Swiss precision.
Dan is a mediapreneur, photographer, author of several books, owner of StudioPrague and Founder + Editor in Chief of SexyWomenPhotography.com. Being a successful photographer for more than 15 years Dan got internationally published and featured on/in GQ Online, The India Times, FashionONE TV, FotoTV, GoodLight Mag, amongst many others.
Dan is currently residing and working in Prague, CZ, conducting nude photography workshops, productions and pushing educational formats to a new level.
Consider a Small Donation?
Your donation helps to sustain, create and regularly update the free content for you.
I love offering my knowledge to you and a small token of appreciation helps to keep the lights on.
Thank You!
Consider a Small Donation?
Your donation helps to sustain, create and regularly update the free content for you.
I love offering my knowledge to you and a small token of appreciation helps to keep the lights on.
Thank You!