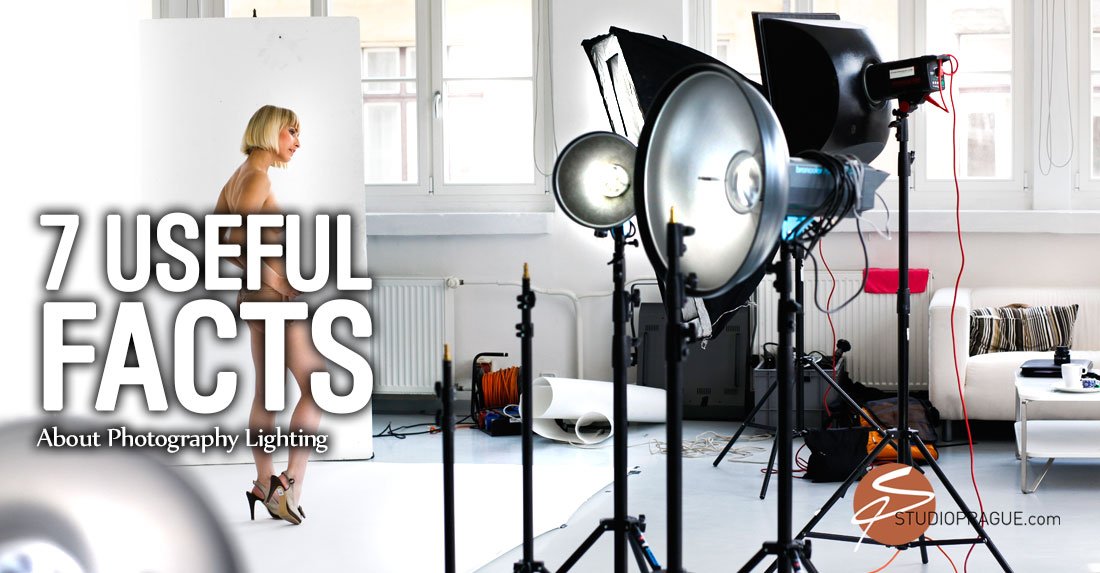
[Part 15/23 | Module 3: MASTERING THE LIGHT]
Broad, far, hard, bouncing… – each light setup results in a different “atmospheric” outcome. Setting lights critically influences mood and message of the finished photo.
“Light Quality” (also called “Quality of Light”) is what will be discussed in this installment. Light and quality…huh?!
At first sight, describing one aspect of lighting with the term “quality” might sound confusing in theory but in practice it is rather simple: it is all about how hard or soft (diffused) light is. Or the other way around, how hard or soft shadows (shadow areas) look. Lighting is all about shadows, about shadow creation. No shadows = no plasticity…
The other aspects of lighting are “Light Quantity”, “Light Direction” & “Color”, btw.
What follows are 7 Real-Life Photography Lighting Facts that you should know in order to influence moods and styles.
Fact #1 – A Broad Source Of Light Softens Shadows
A broad light source produces fewer shadows, shadows that are less defined, lower contrast, and it suppresses texture (think skin texture when shooting nude models).
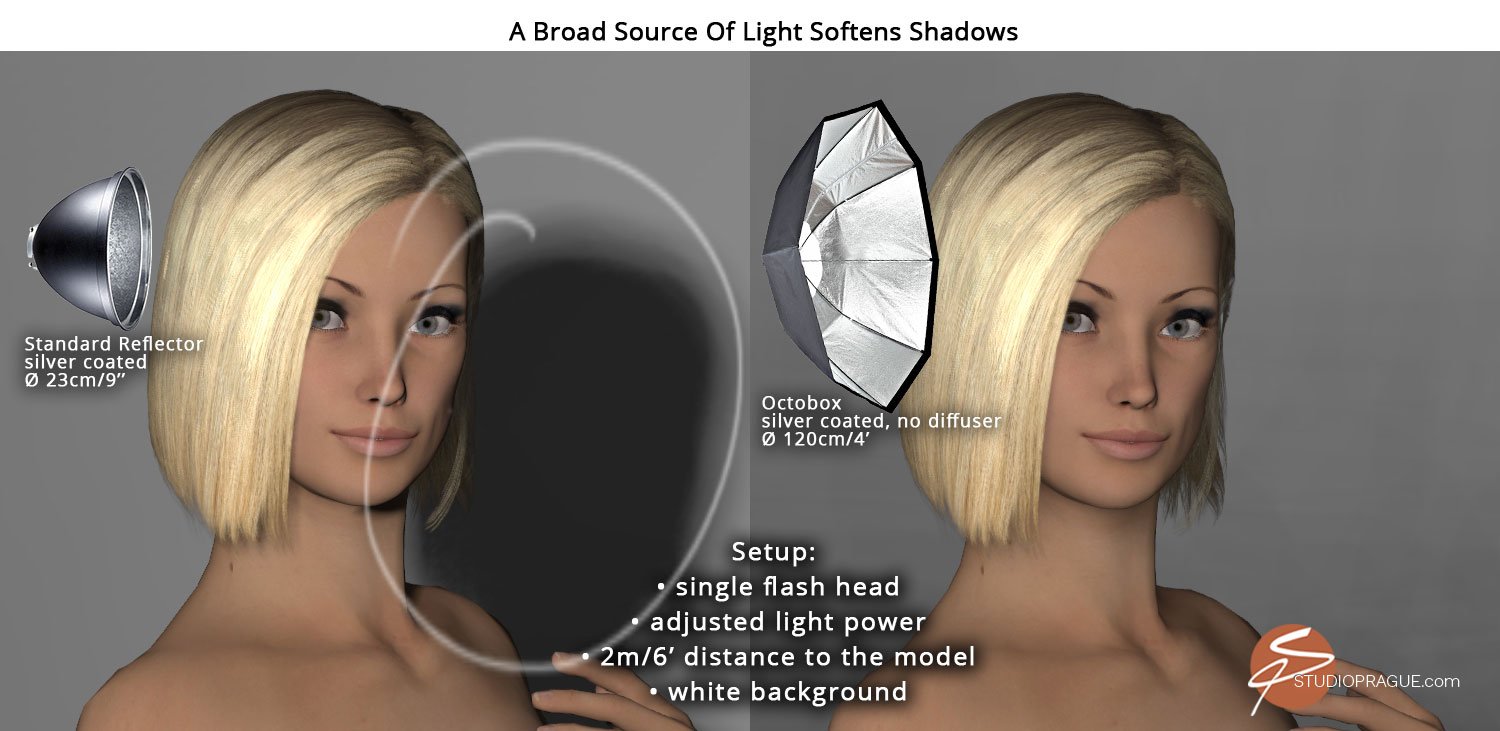
Broad sources of lighting allow the light to illuminate the model from many different directions. By so doing, shadows are filled in and the light appears “softer” (= long shadow transition areas).
Conversely, a narrower light source leads to an opposite result.
TIP: When you position your model near a large and bright window, one that doesn’t include direct sunlight, it provides a broad source of light. By doing this, you will achieve a so-called “large soft-box effect” even though you are not using a soft-box or flash.
Fact #2 – Light Gets Harder Or Softer Depending On Its Distance To The Model
When your light source is close to your model, it produces softer light. When your light source is further from your model, it produces harder light, that is, light with more pronounced shadows.
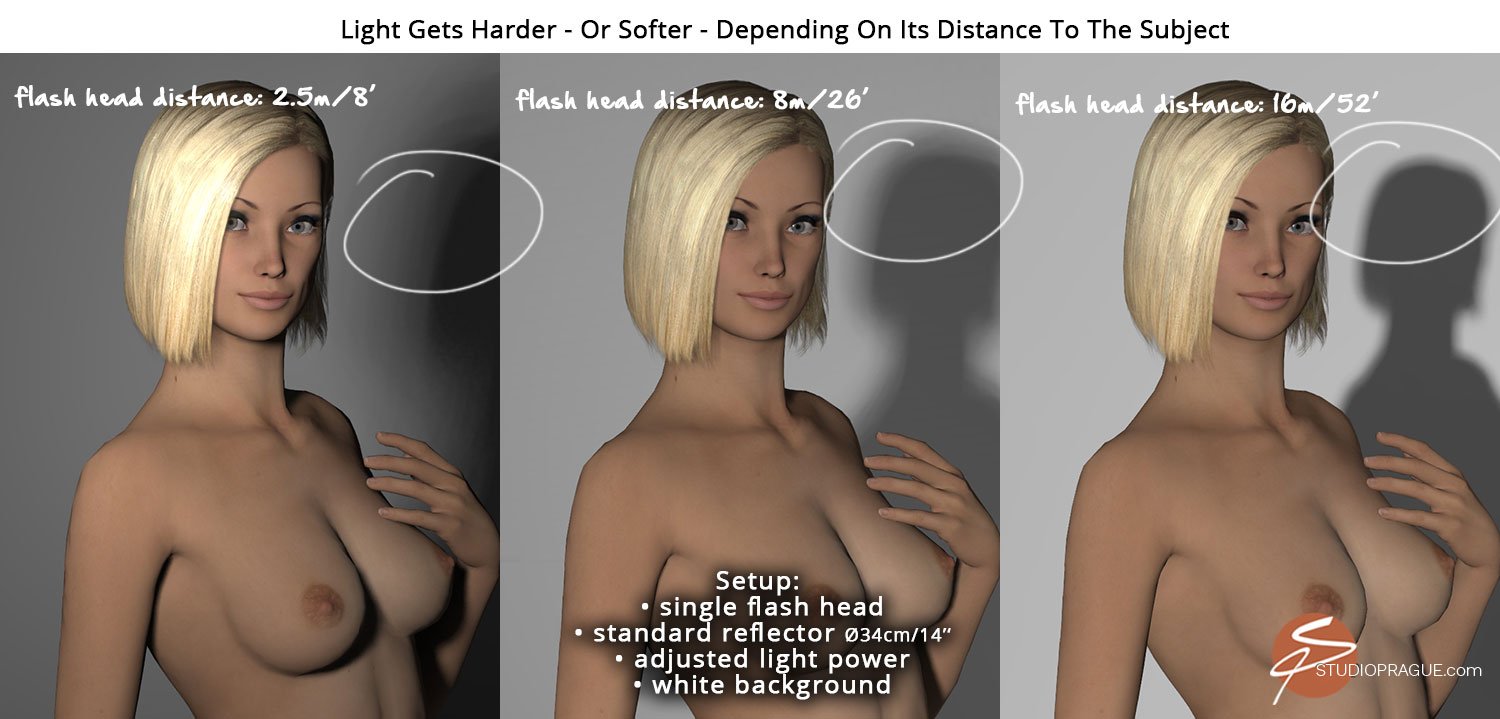
In other words, by increasing the distance between your light and the model, harder light will result. By moving your source closer, the light source will produce a broader, larger light relative to your model and, consequently, softer light will result.
The sun is a good example of this characteristic of lighting. Our solar system’s star is 109 times the Earth’s diameter and, because of its size, certainly represents a very large and broad light source. However, because the sun is located at a distance of 150 million kilometers (93M miles) from Earth, it appears much, much smaller in the sky than it actually is. Because of the sun’s distance, it becomes a smaller light source relative to your model and produces harder light.
TIP: If you want to create deeper shadows to produce more contrast and “drama” in your photo, move the light source further away from your model. You will, of course, also need to increase the power output of your light source or adjust your exposure settings to capture your photo in a way that is correctly exposed. Conversely, if you want softer light with less contrast and fewer shadows, move your light source closer to your model. A light source that is set closer to your mode, especially when it is modified with a softbox, an umbrella or some other modifier designed to diffuse or scatter the light will produce soft light.
Fact #3 – Diffusion Scatters The Light
Diffusion scatters the light, making the light source broader and, as a result, softer.
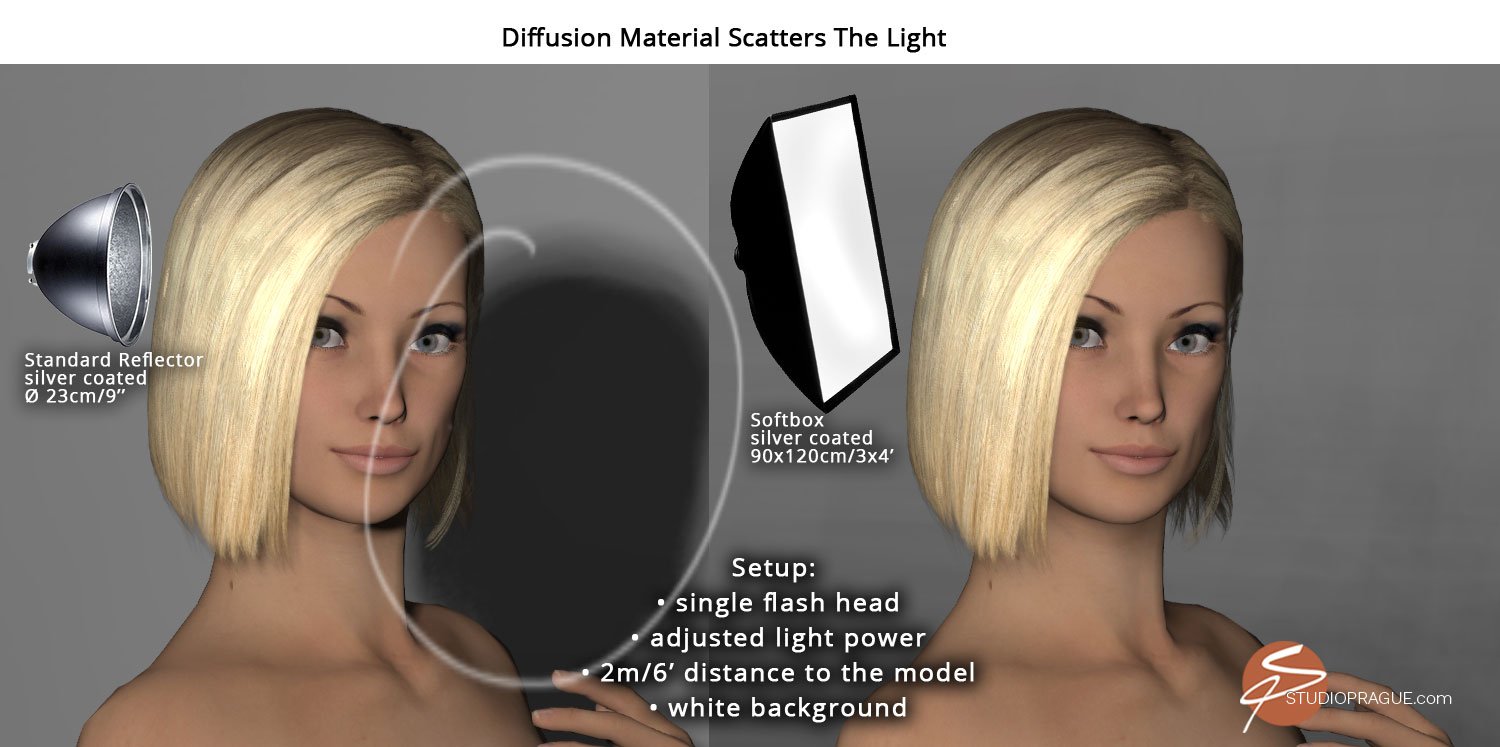
When shooting outdoors, shadows appear less distinct when clouds move in front of the sun or it is an overcast day. That’s because the clouds are acting like giant diffusers, scattering the sun’s light in nearly infinite directions. Clouds or cloud cover act as diffusers. They are like giant, natural, softboxes in the sky. When the sky is entirely overcast, the entire sky acts like one, giant diffuser.
When shooting indoors, you can achieve the same effect as clouds in front of the sun by using thin, white fabrics, translucent plastic, or a large softbox or translucent umbrella. Doing so will scatter and diffuse the light. You can also create the same effects outdoors by using some of the same sorts of tools (= aka “scrims”) to diffuse sunlight, as well as to scatter your artificial light if you’re adding flash to daylight.
Fact #4 – Bouncing The Light Will Cause Diffusion
When the light is reflected or bounced off a larger surface, whether it’s a wall, a ceiling, a reflector, or some other surface, the light that reflects will scatter in all directions and become diffused and, consequently, softer. By pointing your light source at these objects, or setting your model in positions where she is bathed with reflected sunlight, soft, diffused, and scattered light will result.
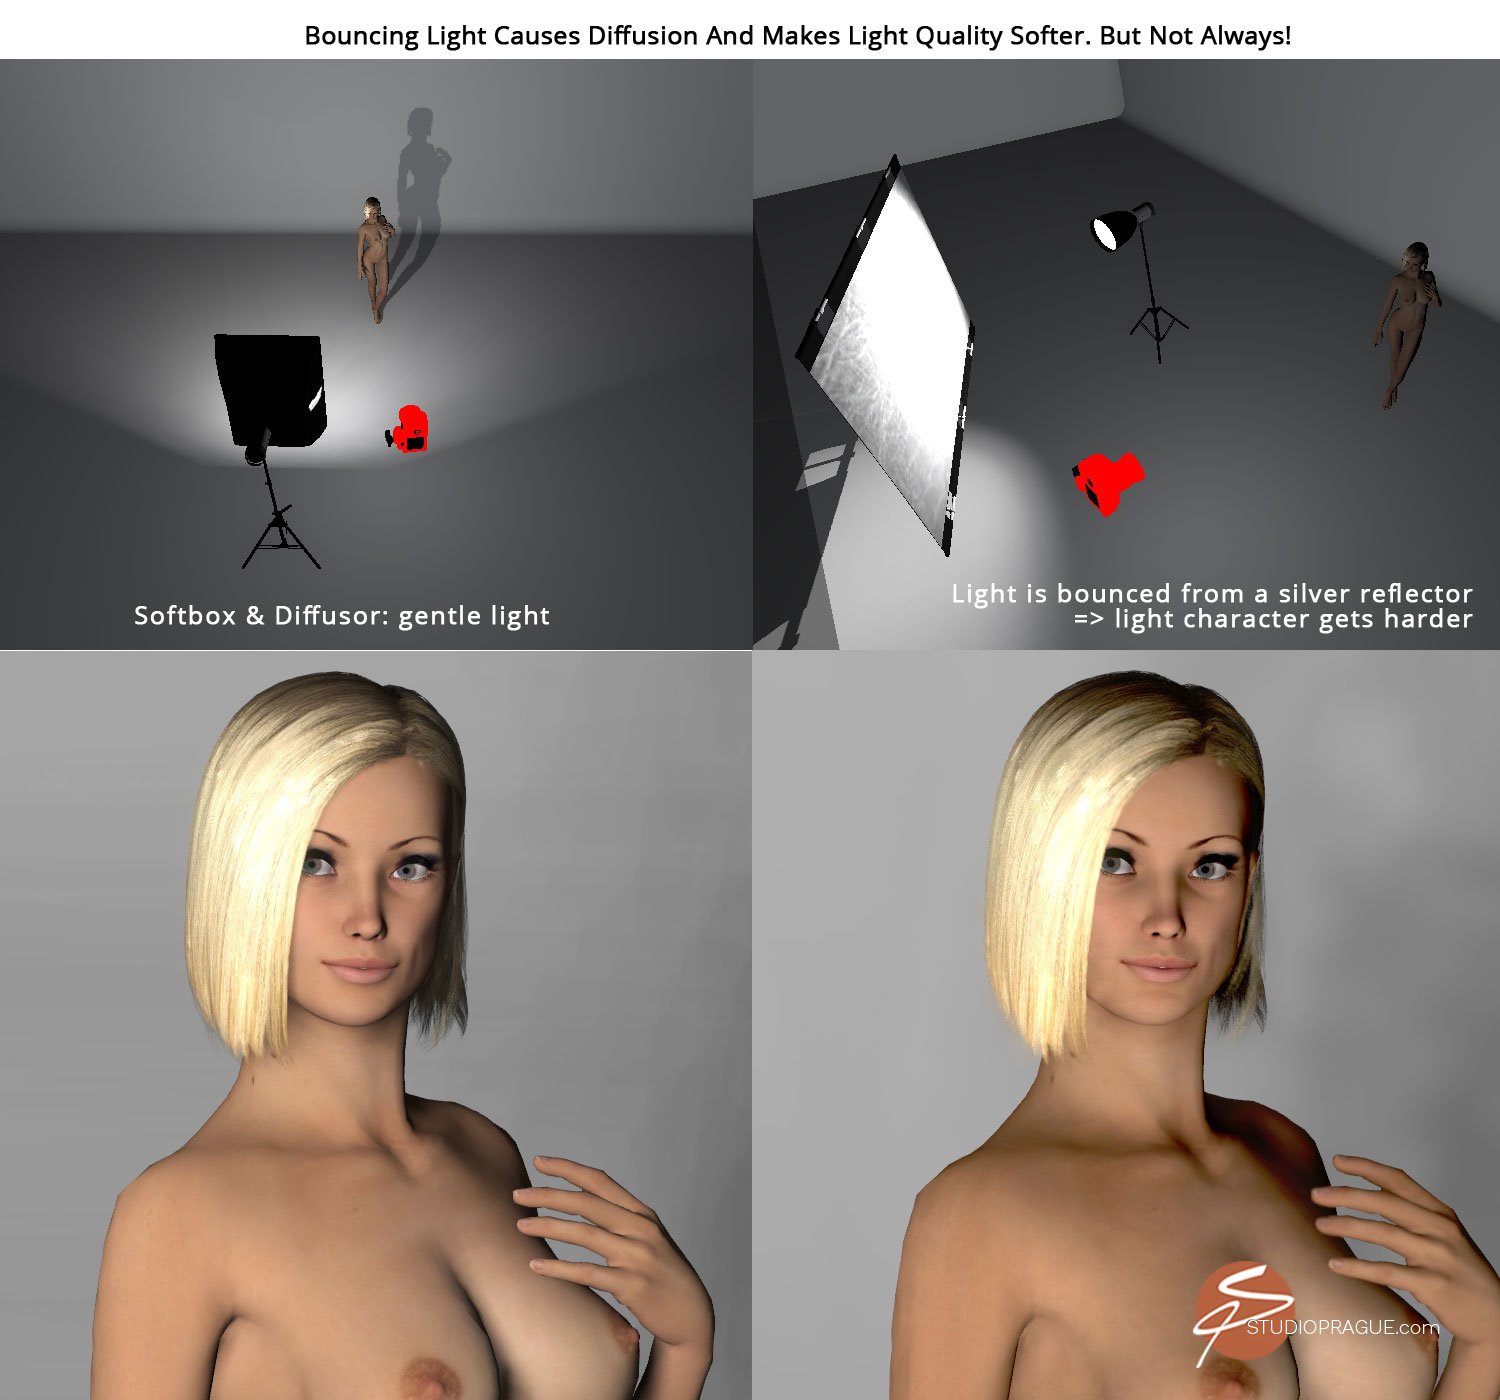
NOTE: The shinier, i.e., the more reflective whatever is being used to bounce light, the harder the light becomes. A mirror, when used to reflect sunlight, will produce a hard light. That’s because the reflective properties of a mirror do not allow the light to scatter like it does when using a less reflective surface to bounce the light: for example, a white reflector. Silver and gold reflectors bounce less-scattered light and, therefore, produce light that is harder light when directed at your model.
TIP: If you take a large piece of aluminum foil and crumple it, and then spread it out and wrap it around a piece of cardboard, keeping the shinier side of the foil on the outside, you will make a good reflector that is harder in terms of the quality of light it produces, than a matte white surface. It will, however, be significantly softer than a mirror (because the foil is crumpled versus flat-and-even as with a mirror.) The crumbling of the foil will help scatter the light (softer light) yet its highly-reflective qualities will still produce a somewhat harder light. A somewhat harder light, one that lies somewhere between a matte-white surface and a mirror, often adds “punch” to your photos without it being too overly hard of a light source.
Fact #5 – Light Falls Off With Distance
Light falls off and becomes dimmer and less intense as the distance increases between the light source and whatever the light is reflecting off. (Note: Photography records the light that reflects off your subject and bounces back onto your camera’s sensor where it is recorded as an image. The more sensitive your sensor is to the light – as it becomes when using higher ISOs – the more light it collects and can use to create photographic images.)
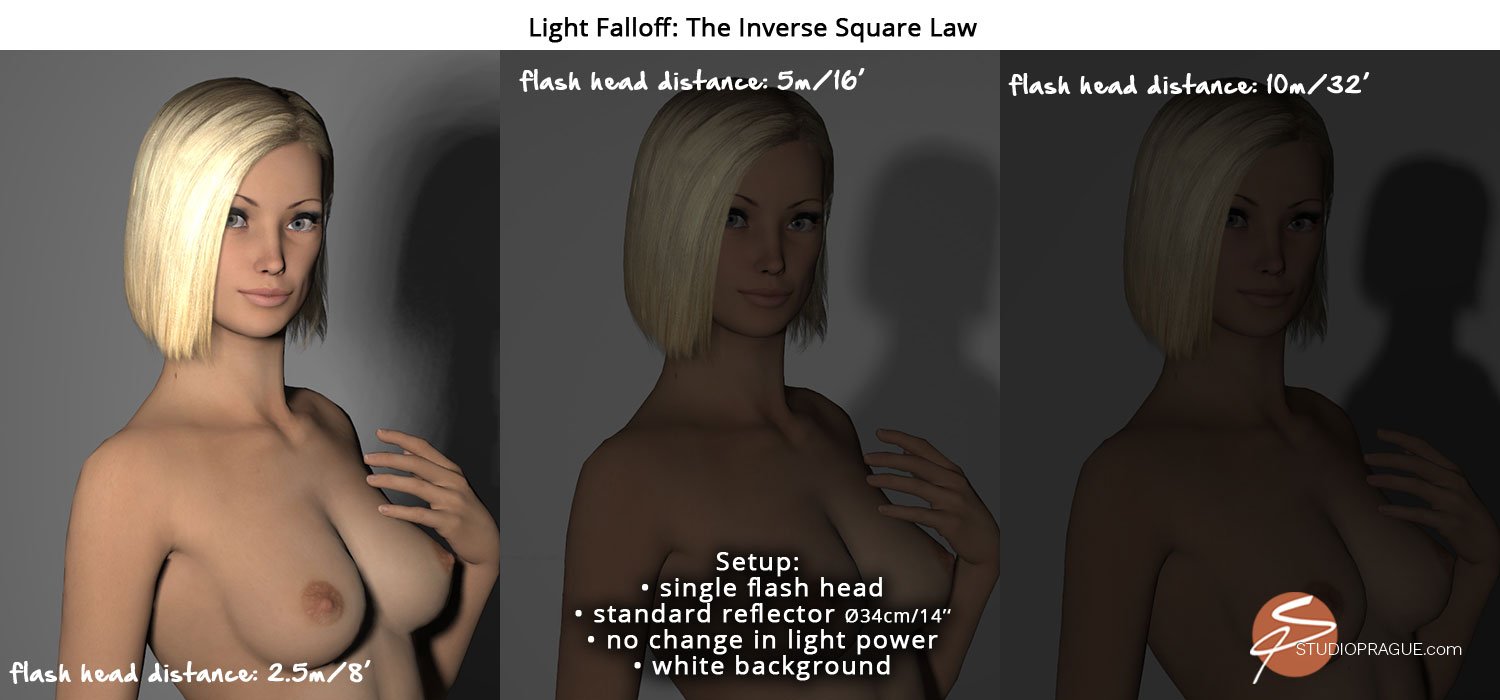
There is an equation in physics that is used by photographers to calculate the fall-off of light in terms of the distances between the light source and its targets. It’s called the Inverse Square Law (Premium Library article). It’s a physical law stating that a specified physical quantity or intensity of something (in this case, the light produced by an artificial lighting source like a strobe) is inversely proportional to the square of the distance from the source of that physical quantity.
As photographers, we’re not physicists or mathematicians. Well, perhaps some photographers are physicists and mathematicians but most are not. So, in plainer and more practical terms for all you non-physicist/non-mathematician photographers, what this means is this: If you move your light source twice as far from your model, you will get just one-quarter of the light to work with (in terms of exposure.) In other words, the greater the distance between your light and your model, the less light you will have for proper exposure.
It’s important to keep this in mind when you are moving your lights further from your model to create harder light. When doing so, you’ll also need to adjust your exposure or increase the power output of your light source because the greater the distance between your model and your light source, the more the light falls off. This physical law can be a great help in terms of the light illuminating your background, i.e., the further your model is from the background, the less the light (you’re using to illuminate your model) your strobe or flash will produce on the background. If you want more light for your background, you’ll either need to light it separately or move your model closer to the background so there’s less fall-off of light when it reaches your background.
TIP: If you have the option on your camera, set your camera’s flash to “fill flash” when you are taking photos outdoors, particularly when the light conditions are harsh. The shadows will be lightened (made less-clearly defined) because the flash will fill the shadows while producing little to no impact on your background exposure.
Fact #6 – Use Light Falloff To Take Better Pictures
Use the light’s fall-off properties to change the way your model appears.
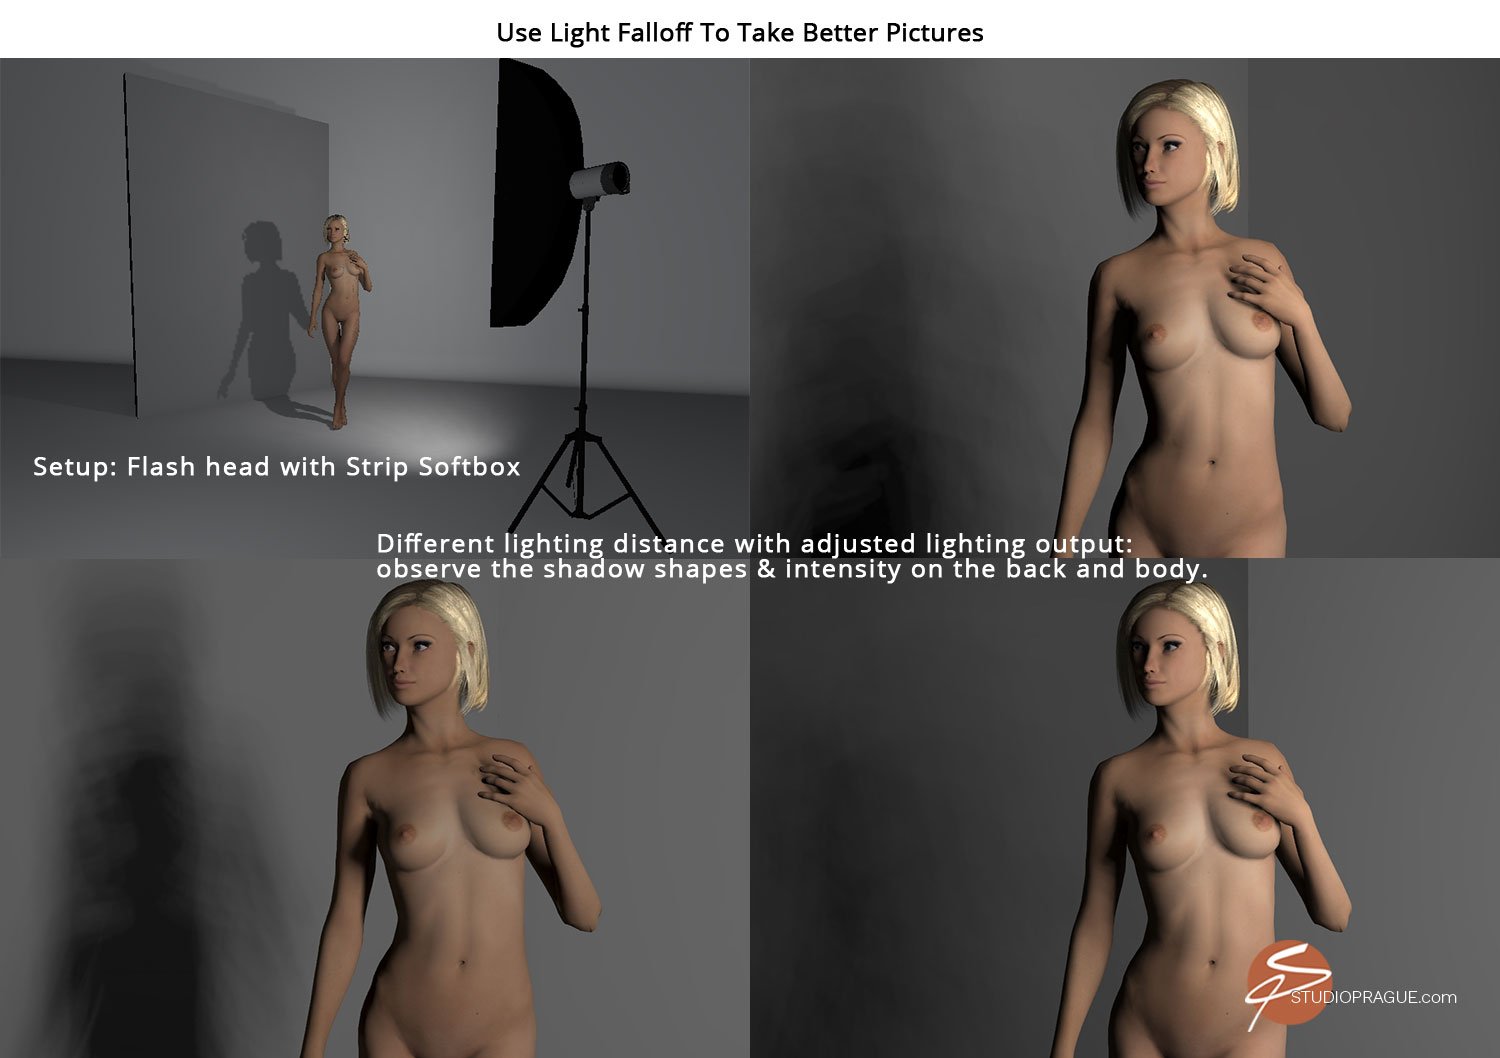
When your model is posing closer to a light source, the fall-off is more noticeable. On the other hand, your background (say, when using a seamless background) will appear darker if the light is further away from the model and depth and texture are added to her skin.
Note: This holds true for side-lighting as well. Compared to light sources at greater distances, the fall-off becomes more prominent and noticeable across the frame when the light is coming from the sides of the model, creating highlights and also creating the illusion of more depth and texture.
Fact #7 – Shadows Create The Illusion Of Volume
Shadows provide volume and dimensionality, leastwise the illusion of volume and dimensionality.
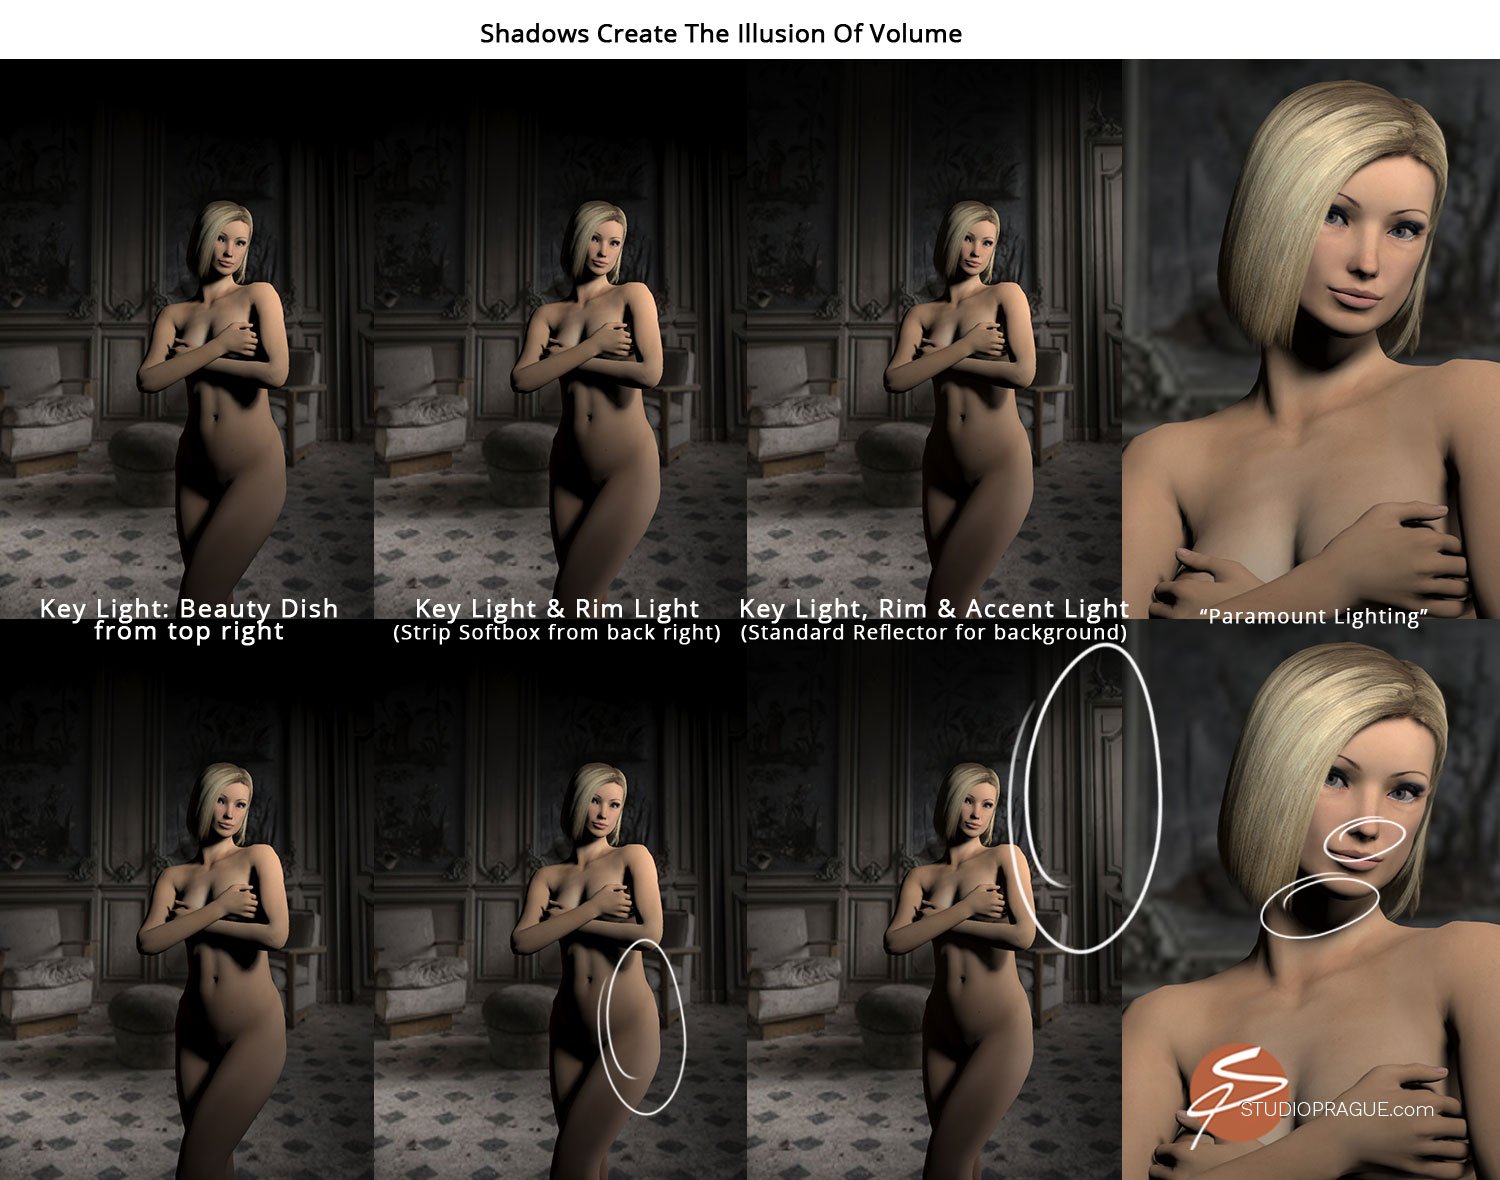
Imagine looking at an object floating in space, rather than a flat, two-dimensional surface which is what a photograph is. That object in space has volume and dimensionality. It has three dimensions. Photographs contain only two dimensions. Often, it’s the photographer’s job create the illusion of the third dimension. Even 3D photos only have two, actual dimensions. The third dimension, the one that makes a 3D photo a 3D photo, is a trick, an illusion. The 3rd D doesn’t exist except in the minds of viewers, tricked viewers.
You will notice the illusion of volume, or dimensionality, when the lighting is coming from below, above, or from the sides of your model. The longer and deeper the shadows, the more the illusion of dimensionality the low/high/side lighting produces. That’s why landscape, product, and still-life photographers prefer angular lighting of this sort, that is, lighting from below, above, and the sides. It creates the illusion of depth, i.e., the 3rd dimension. These same sorts of lighting illusions can be utilized in portrait and nude photography to create volume and dimensionality.
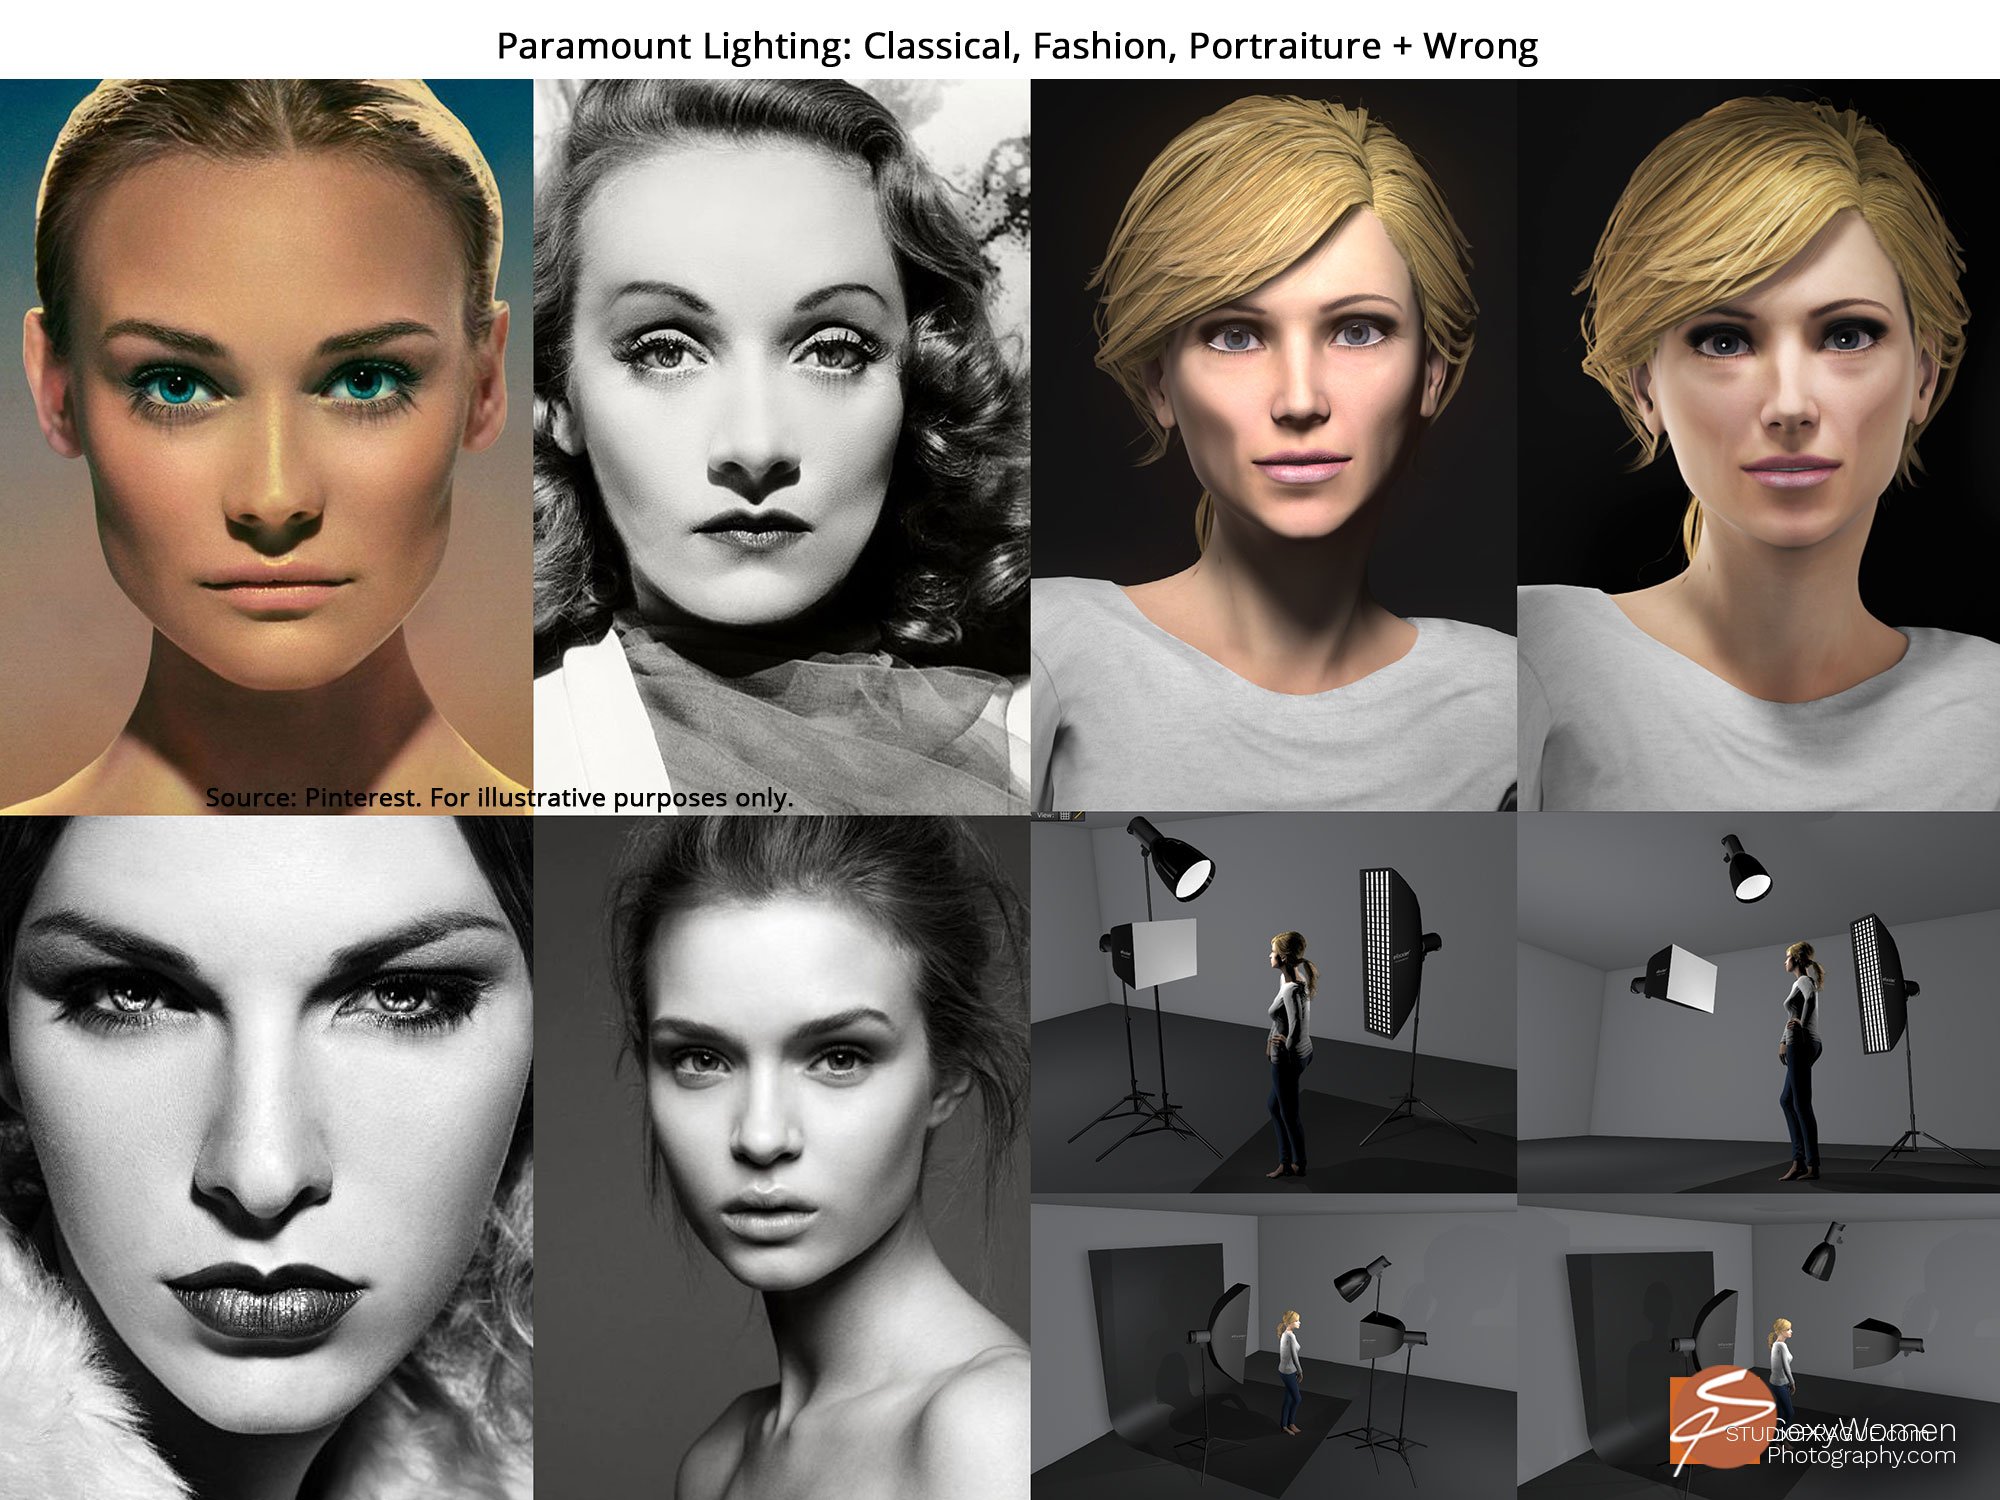
TIP: If and when you want to create more dramatic effects for your glamor and nude photography, you can utilize what’s called, “Hollywood Lighting” (or Paramount Lighting). Hollywood or Paramount Lighting keeps the main light higher above and to one side or the other of your model. The higher light is angled downward to produce shadows under the nose and the jawline.
Caution: Don’t use too extreme of an angle as it will produce a nose shadow that will fall below the upper lip… not considered a good thing as these things go.
Thanks for reading.

set.a.light 3D Basic & STUDIO (Software)
set.a.light 3D STUDIO is the world’s first photo studio simulation, with which you can build lighting setups in advance. It’s the perfect photography studio simulator.
Prepare your shooting easily and plan the smallest detail, even before you enter the studio- all you need is a computer and ideas! Save a lot of time and money with experimenting & implementing your ideas & visions before you get on spot.

Author: Dan Hostettler ![]()

A traveler at heart, inspired by women, working along Swiss precision.
Dan is a mediapreneur, photographer, author of several books, owner of StudioPrague and Founder + Editor in Chief of SexyWomenPhotography.com. Being a successful photographer for more than 15 years Dan got internationally published and featured on/in GQ Online, The India Times, FashionONE TV, FotoTV, GoodLight Mag, amongst many others.
Dan is currently residing and working in Prague, CZ, conducting nude photography workshops, productions and pushing educational formats to a new level.
Consider a Small Donation?
Your donation helps to sustain, create and regularly update the free content for you.
I love offering my knowledge to you and a small token of appreciation helps to keep the lights on.
Thank You!
Consider a Small Donation?
Your donation helps to sustain, create and regularly update the free content for you.
I love offering my knowledge to you and a small token of appreciation helps to keep the lights on.
Thank You!
